A Step-by-Step Guide to Moving Your IIS .NET Applications from On-Premises to Azure Environment

 Transitioning Seamlessly: A Step-by-Step Guide to Moving Your IIS .NET Applications from On-Premises to Azure Environment

Introduction:

In today’s digitally-driven world, businesses are seeking efficient, scalable, and cost-effective solutions for their applications. The move from on-premises hosting to a cloud-based environment, such as Azure, has become a strategic imperative. This article offers a step-by-step guide to successfully transitioning your IIS .NET applications from on-premises to the Azure environment. By integrating Azure DevOps, Jenkins, and GitHub, you can leverage the power of continuous integration and deployment, making the transition smooth and efficient.
 

Why Move to Azure?

Cloud computing continues to redefine the landscape of modern business. Microsoft Azure, with its robust infrastructure, has emerged as a leader in this space, providing extensive capabilities for deploying, managing, and scaling applications.


 Key Benefits of Azure:


Scalability and Flexibility: Azure allows you to scale up or down based on your application’s demand, leading to cost savings.

Reliability and Security: Microsoft invests heavily in security, making Azure one of the most secure cloud platforms.

Integration with Tools: Azure seamlessly integrates with various DevOps tools like Jenkins, Azure DevOps, and GitHub, simplifying the deployment process.

Planning the Migration: Step-by-Step

The successful transition of your IIS .NET applications to the Azure environment relies on a strategic and systematic approach. The following steps provide a roadmap for this journey.


 Step 1: Pre-Migration Assessment

Before initiating the migration process, conduct an assessment of your current .NET applications. This helps identify potential issues that could arise during the migration.


Subtasks in Pre-Migration Assessment


Review the application’s architecture

Analyze the application’s dependencies

Evaluate the security requirements

Step 2: Set Up Azure Environment

Prepare your Azure environment for migration. This involves setting up Azure DevOps, creating an Azure App Service for hosting your application, and configuring necessary network components.


Step 3: Configure Continuous Integration/Continuous Deployment (CI/CD)

Implementing CI/CD is crucial for maintaining a consistent and reliable deployment process. Set up Jenkins or Azure DevOps pipelines to automate the build and deployment process.


Step 4: Migration

With the environment set up and CI/CD configured, you can now proceed to the migration of your IIS .NET applications. Use Azure’s migration tools or manually move the application code and data.


Step 5: Post-Migration Testing and Optimization

Post-migration, it’s important to thoroughly test your applications and optimize them for the new environment.


Leveraging Jenkins, GitHub, and Azure DevOps

These tools are instrumental in streamlining the migration process and maintaining a high standard of application performance post-migration.


Jenkins

Jenkins is an open-source automation server that can help to automate the non-human part of the software development process. It integrates with Azure, allowing you to manage and control the application development process from a centralized platform.


GitHub

GitHub hosts your application’s code, facilitating collaboration among teams. When integrated with Azure DevOps and Jenkins, you can automate the process of code integration and deployment.


Azure DevOps

Azure DevOps provides a range of services, including Azure Pipelines, which supports CI/CD, enabling automatic deployment of your applications.


FAQs

Q1: How can I ensure the security of my application during the migration process?

Azure provides numerous security tools and best practices to ensure data integrity during the migration.


Q2: What if my application performance degrades after the migration?

Azure provides tools for monitoring application performance and diagnosing issues, allowing you to optimize and improve performance post-migration.


Q3: Can I integrate other CI/CD tools with Azure?

Yes, Azure provides seamless integration with a range of CI/CD tools including Jenkins, GitHub Actions, and others.

 Conclusion

The transition of your IIS .NET applications from an on-premises environment to Azure doesn’t have to be daunting. By following a systematic approach and leveraging the capabilities of Azure DevOps, Jenkins, and GitHub, you can make this process seamless and efficient. Embrace the opportunities that Azure offers to optimize your application and bring it to new heights in the digital space.

Migrating OnPrem GitHub, Jenkins, IIS CI/CD Environment to Azure DevOps and Kubernetes

 Introduction

With the increasing popularity of cloud platforms, many organizations are moving their development and deployment operations to the cloud. Azure DevOps and Kubernetes are two popular cloud platforms that offer several benefits to businesses. If you’re still using OnPrem GitHub, Jenkins, IIS CI/CD environment, it’s time to migrate to Azure DevOps and Kubernetes.


This article will guide you through the process of migrating OnPrem GitHub, Jenkins, IIS CI/CD environment to Azure DevOps and Kubernetes. We will explore the benefits of using Azure DevOps and Kubernetes and the steps involved in the migration process.


 Why Move to Azure DevOps and Kubernetes?


Migrating to Azure DevOps and Kubernetes offers several benefits, including:


  1. Scalability: Azure DevOps and Kubernetes offer scalability, making it easy to increase or decrease resources as needed.


  1. Cost Savings: Azure DevOps and Kubernetes are cost-effective compared to OnPrem GitHub, Jenkins, IIS CI/CD environment.


  1. Automation: Azure DevOps and Kubernetes offer automation capabilities, reducing manual work and increasing efficiency.


  1. High Availability: Azure DevOps and Kubernetes offer high availability, ensuring that your applications are always available.


Steps Involved in Migrating OnPrem GitHub, Jenkins, IIS CI/CD Environment to Azure DevOps and Kubernetes


  1. Evaluate Your Current Environment: Before migrating to Azure DevOps and Kubernetes, evaluate your current environment. Identify the applications, services, and dependencies that need to be migrated.


  1. Create an Azure Account: To use Azure DevOps and Kubernetes, you need an Azure account. If you don’t have an account, create one.


  1. Set up Azure DevOps: Once you have an Azure account, set up Azure DevOps. This involves creating a new organization and project.


  1. Create a Kubernetes Cluster: To use Kubernetes, you need to create a Kubernetes cluster. You can create a cluster in Azure Kubernetes Service (AKS).


  1. Install Jenkins in Kubernetes Cluster: Install Jenkins in the Kubernetes cluster. This involves creating a Jenkins deployment and service.


  1. Migrate GitHub Repositories: Migrate the GitHub repositories to Azure DevOps. This involves creating a new Git repository in Azure DevOps and pushing the code.


  1. Migrate Jenkins Jobs: Migrate the Jenkins jobs to Azure DevOps. This involves creating new pipelines in Azure DevOps and configuring them.


  1. Migrate IIS Applications: Migrate the IIS applications to Kubernetes. This involves creating a Docker image of the application and deploying it to Kubernetes.


  1. Test and Validate: Once you have migrated all the applications and services, test and validate the new environment. Ensure that everything is working as expected.


 FAQs


Q: What is Azure DevOps?

A: Azure DevOps is a cloud-based platform that offers several services, including source control, build and release management, and project management.


Q: What is Kubernetes?

A: Kubernetes is a container orchestration platform that automates deployment, scaling, and management of containerized applications.


Q: Why Should I Migrate to Azure DevOps and Kubernetes?

A: Migrating to Azure DevOps and Kubernetes offers several benefits, including scalability, cost savings, automation, and high availability.

Conclusion

Migrating OnPrem GitHub, Jenkins, IIS CI/CD environment to Azure DevOps and Kubernetes is a necessary step for organizations that want to take advantage of the benefits offered by cloud platforms. The migration process involves evaluating your current environment, creating an Azure account, setting up Azure DevOps, creating a Kubernetes cluster, installing Jenkins in the Kubernetes cluster, migrating GitHub repositories and Jenkins jobs, migrating IIS applications, and testing and validating the new environment.

By migrating to Azure DevOps and Kubernetes, you can enjoy scalability, cost savings, automation, and high availability. Make the move and take your business to the next level.

Node.js Application with a DevOps Workflow using Github, Jenkins, SonarQube and Azure Kubernetes

Setting up a DevOps Environment using Node.js, Github, Jenkins, SonarQube, and Azure Kubernetes

Developing a Node.js application is a common use case in the software development industry. In this article, we will show you how to set up a DevOps environment for a Node.js application using Github, Jenkins, SonarQube, and Azure Kubernetes.

Github is a version control system that allows you to store and manage your code in a centralized repository. To start, you need to create a Github repository for your Node.js application.

Next, we will set up Jenkins for continuous integration. Jenkins is a tool that automates the process of building, testing, and deploying code. To configure Jenkins, you will need to install the Jenkins plugin for Github. This plugin allows Jenkins to automatically build and test your code when changes are pushed to the Github repository.

After that, we will set up SonarQube, which is a code quality tool. It analyzes the source code of your application and identifies potential issues such as bugs, security vulnerabilities, and code smells. To set up SonarQube, you need to install the SonarQube Jenkins plugin. This plugin integrates SonarQube with Jenkins and allows you to run code analysis before deploying the code.

Finally, we will deploy the application to Azure Kubernetes, which is a managed Kubernetes service provided by Microsoft. To deploy the application, you will need to create a Kubernetes cluster in Azure and configure it to run your application.

In summary, by setting up a DevOps environment using Node.js, Github, Jenkins, SonarQube, and Azure Kubernetes, you can automate the process of building, testing, and deploying code, ensuring that your application is of high quality and is deployed to production in a timely manner.

How to set up a Kubernetes infrastructure on Azure and install applications using Helm in less than 20 minutes

Setting up a Kubernetes Infrastructure on Azure

Kubernetes is a powerful open-source platform that helps to manage and automate the deployment, scaling, and operation of containerized applications. In this article, we will show you how to set up a Kubernetes infrastructure on Azure and install applications using Helm in less than 20 minutes.

Prerequisites:

  • Azure account: To set up a Kubernetes infrastructure on Azure, you need to have an Azure account.
  • Azure CLI: You also need to have Azure CLI installed on your local machine.

Step 1: Create a Kubernetes Cluster on Azure

The first step is to create a Kubernetes cluster on Azure. You can do this by running the following command in the Azure CLI:

az aks create --name <cluster-name> --resource-group <resource-group-name> --node-count <node-count> --generate-ssh-keys

Replace <cluster-name> with the name of your Kubernetes cluster, <resource-group-name> with the name of the resource group in which you want to create the cluster, and <node-count> with the number of nodes you want in the cluster.

Step 2: Install Helm

Helm is a package manager for Kubernetes that helps to manage the installation, upgrade, and deletion of applications in a Kubernetes cluster. To install Helm, you need to run the following command:

curl https://raw.githubusercontent.com/helm/helm/master/scripts/get-helm-3 | bash

Step 3: Deploy an Application using Helm

Now that you have Helm installed, you can deploy an application in your Kubernetes cluster using Helm. To deploy an application, you need to find a Helm chart for the application that you want to deploy. You can find Helm charts for different applications on the Helm Hub.

Once you have found the Helm chart for the application you want to deploy, you can install it in your Kubernetes cluster by running the following command:

helm install <release-name> <chart-name>

Replace <release-name> with the name you want to give to the release and <chart-name> with the name of the Helm chart for the application you want to deploy.

Conclusion

In this article, we have shown you how to set up a Kubernetes infrastructure on Azure and install applications using Helm in less than 20 minutes. By using Helm, you can simplify the process of deploying and managing applications in a Kubernetes cluster, making it easier to manage your infrastructure.

Node.Js to Kubernetes journy

Node.Js to Kubernetes journy

Hello all,

Yea yea long time no see 🙂 I know, I haven’t share a new improvement story for long time . Improvement is a kind of life style for me but I couldn’t have time share all of it.

In the mean time I had a lots of changes in my life but the most important is , I have owned my own company , Bigs Bilisim Ltd.Sti. “https://www.bigsbilisim.com

This days , I have some spare time to write a blog , here is the my latest post

Node.Js Application on Docker.

I am managing a multinational companies infrastructure as a Linux / Windows admin and Devops Engineer . My customers ERP systems has no access to internet in any way. ERP systems internet access is not allowing even by a proxy because of the company policy.

Every morning one of trainee updating the all exchange rates in the ERP system manually. Time to time wrong entries or similar mistakes can cause couple of problems.

One day one IT Application teams member called me and can we write a small app for this manual operation. Because ERP system has got the ability of import xml files to ERP system . T.C. Mekez Bankası also publishing the rates as xml format. My answer was challenge accepted 🙂

Well I am not a programmer but I though, I can handle it some how.

I have googled couple of similar solutions and scenarios about the requested solution. I have found the node.js world.

I have wrote the code in one day , If you consider , I don’t have programmer background , it is good timing , I guess.

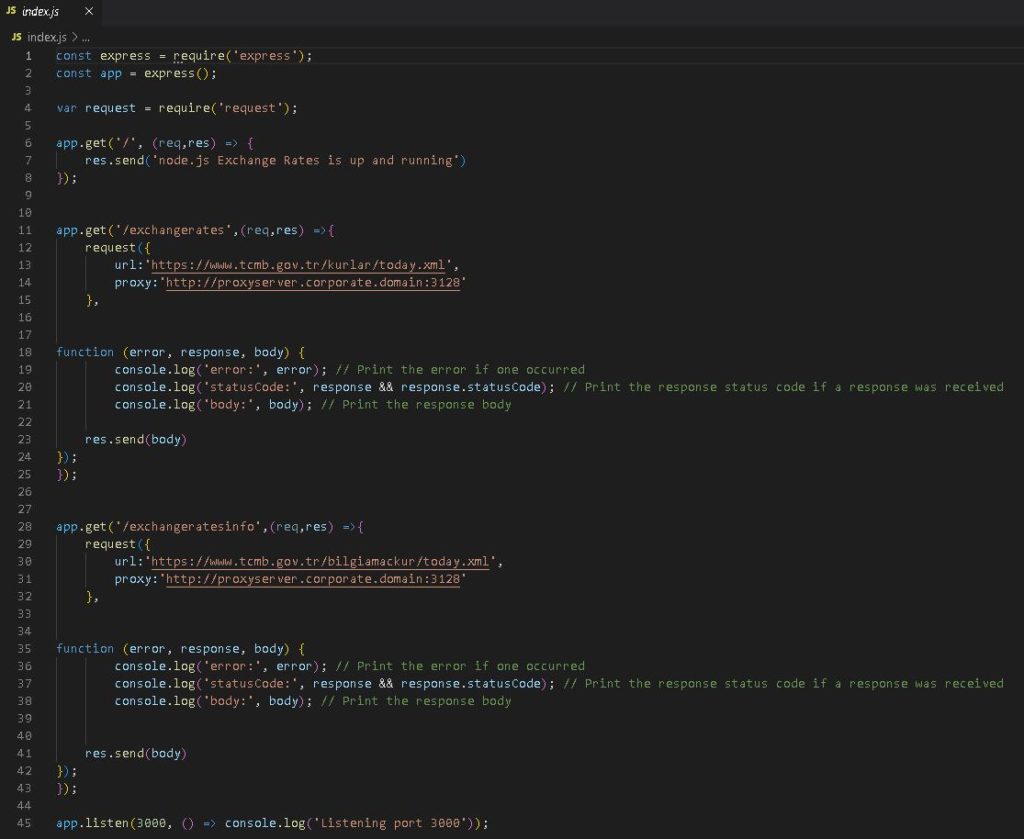
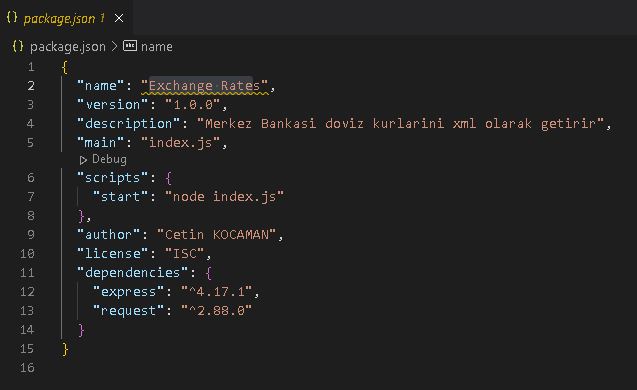
Here is the code of

index.js and package.json

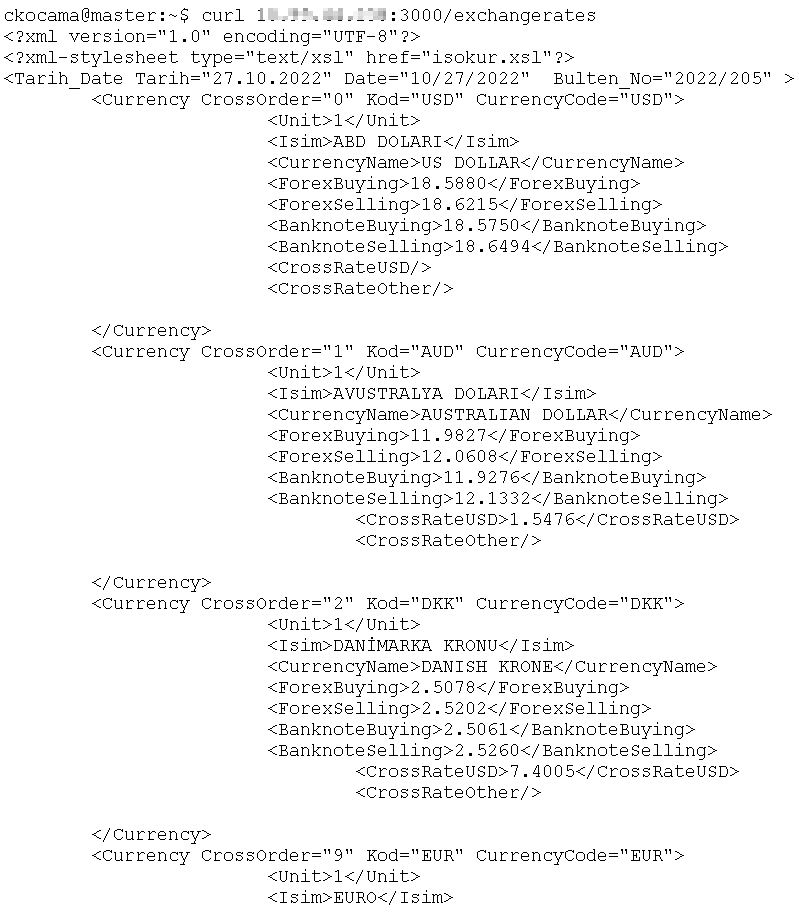
Now when I have run the program in node js it is getting the exchange rates as in xml format by calling url;

Like ;

curl xxx.xxx.xxx.xxx:3000/exchangerates

When they have try to call this url via ERP systems it was successfully entering the Exhange Ratest in it.

Now the challenge is how this small program run in smooth environment without any effects.

This wasn’t a hard task to do it but this time I would like to made a fantasy;

Lets dockerize it.

I have share this program and my dockerize fantasy with the customer, They love it and they were really looking forward the taste it of container technology .

First I have install docker desktop to my machine ,

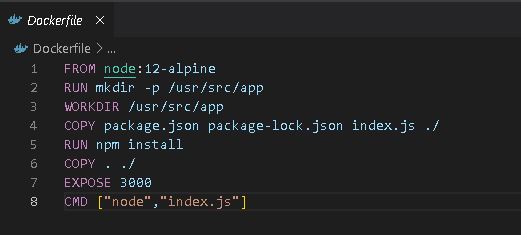
It was another challenge for me , but after watching couple of video , I have prepared the Docker file for this program.

Now I need to create the docker container on my desktop.

I have used this command:

docker build . -t ckocaman/exchange_rates:”Latest”

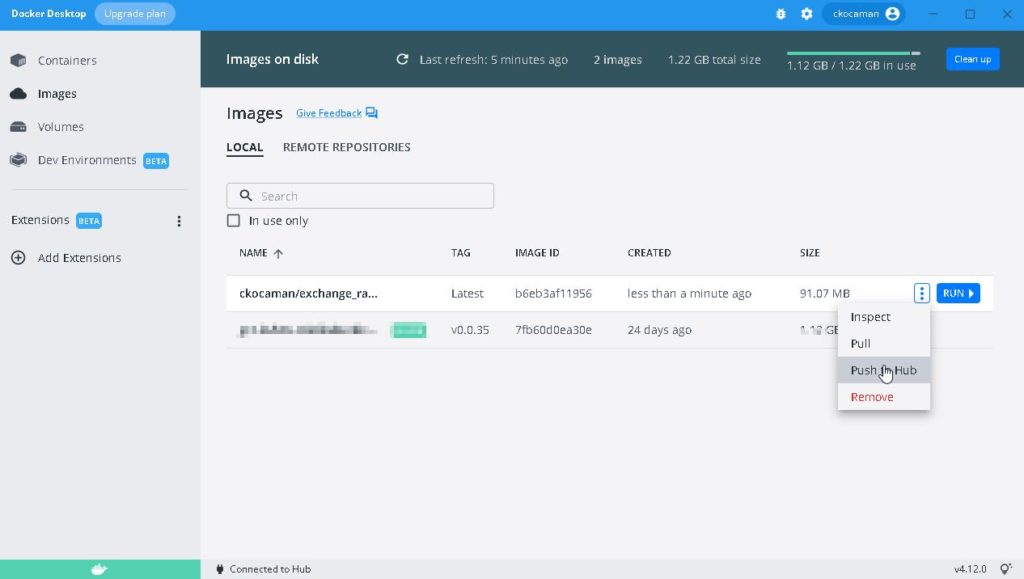
After creating the container I have push it to my docker hub account.

After pushed to hub , I can install on any containerized technology system.

At the beginning it was working on a single docker server , in these days it is a part of a kubernetes cluster as a pod and service.

This small application development story has been opened the application virtualization technology window to me. Well I am still learning it ( I hope every IT Guys keep learning every day !) , but I assume I can do better things with that .

Windows OS Deployment via Ansible AWX Server on ESX Enviroment

Windows OS Deployment via Ansible AWX Server on ESX Enviroment

Hi all, yes it has been a while since my last publish but believe me, in this days , I mean at home office working times. I am working harder and much busy than office working times.

This post I would like to share how to automatize my Windows OS installations on ESX environment via Ansible AWX system.

For this automation steps we need some knowledge about the tools and environment. I will not explain how to install the system or detailed explanation about the systems, I will give you some descriptions , you need follow the documents and learn the tools basics.

What is AWX;

You can find many documents at the internet about it but github project page simple explanation is ; “AWX provides a web-based user interface, REST API, and task engine built on top of Ansible. It is the upstream project for Tower, a commercial derivative of AWX. ” You will find many detailed how to documents about it at “https://github.com/ansible/awx

What is Ansible ;

Ansible is an IT automation tool. It can configure systems, deploy software, and orchestrate more advanced IT tasks such as continuous deployments or zero downtime rolling updates.  Source Ansible Documentation page

What is VMware ESX;

Most of IT people has deep knowledge what is this and how to manage it. Yes most popular Hardware Virtualization solution for corporate IT environment . You can find the latest updates on this page about it.

Lets Continue with the Windows OS Installation steps;

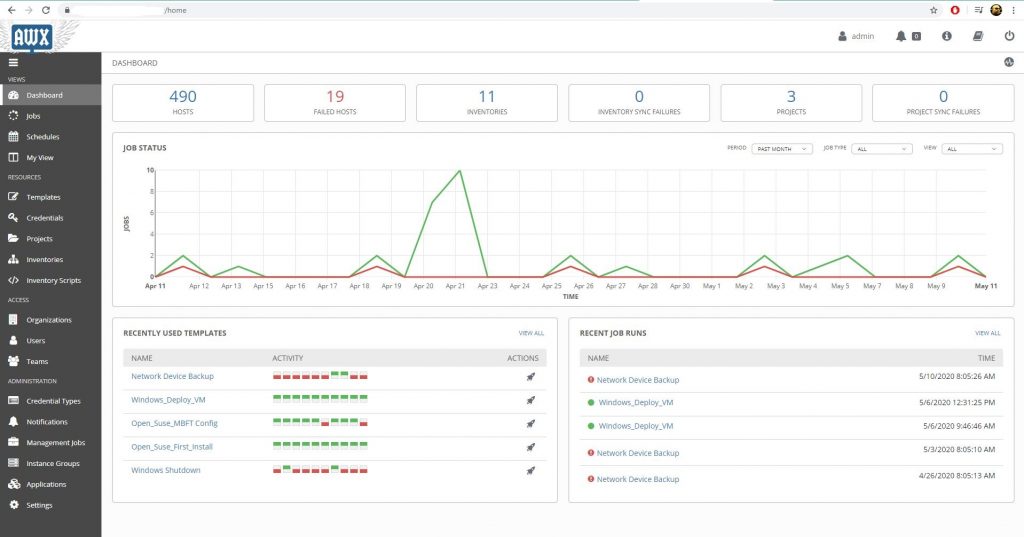
This is the general view of the AWX dashboard.

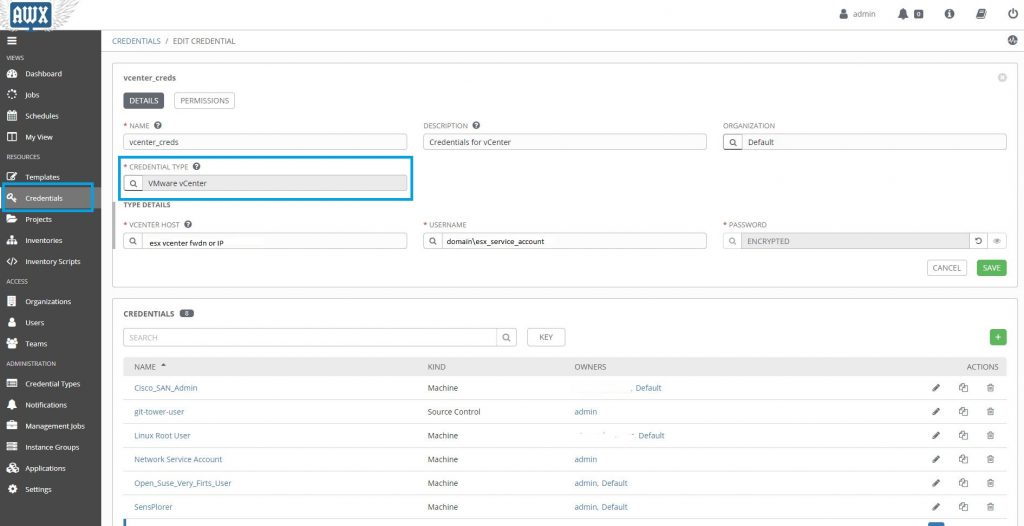
First things first , Lets start with ESX Vcenter access credentials, that user need to have full admin rights on ESX system.

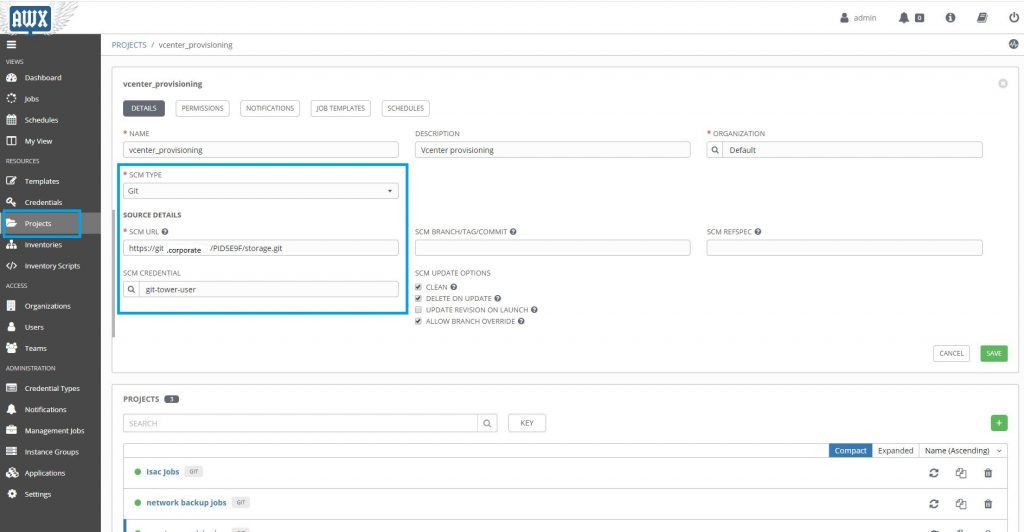
Now for source code management we need to create a project on AWX. I am storing the yaml codes on our corporate github.

You need  also create credentials for github access to download yaml codes. Same as esxvcenter access cred.

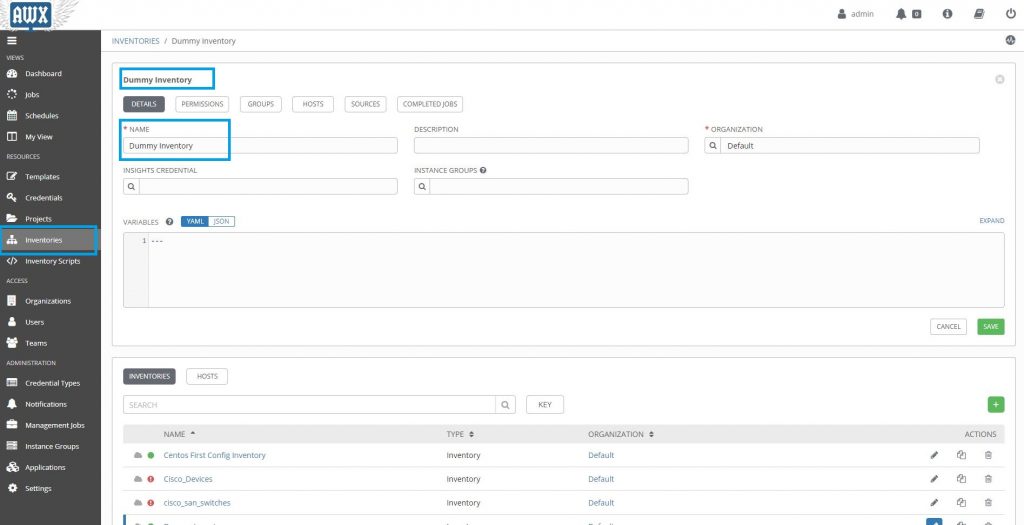
Now we need a dummy inventory group for esx server access .  Dummy inventory is just an empty inventory group.

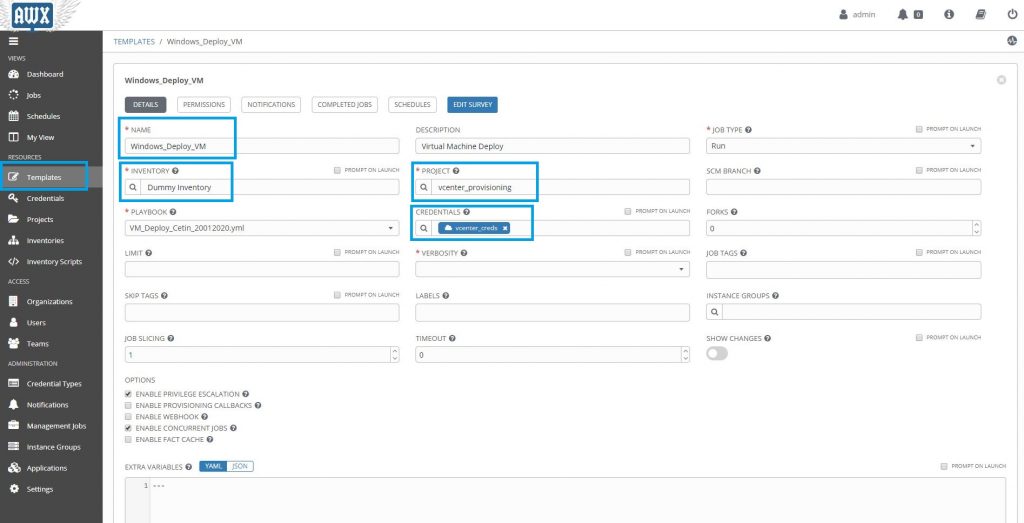
Now time to create a template for our windows OS deploy job. In this section we need to choose which inventory group will use for this,  which project will use for the yaml codes group and which yaml playbook code file should use for it.

Let me share my playbook yaml file with you for give you some idea about the Virtual Windows OS deployment.

I am sharing the code as downloadable file because yaml file indents very important so web site copy paste could harm the indents.

VM_Deploy_Cetin_20012020.yml


---

- name: Create VM Instance
  hosts: localhost
  connection: local
  gather_facts: false


  tasks:

    - name: Check if all variables have been defined
      fail:
        msg: "{{ item }} is not defined"
      when: "{{ item }} is not defined"
      with_items:
        - datacenter
        - cluster
        - folder
        - vmname
        - datastore
        - vlan_name
        - template
        - ip
        - netmask
        - gateway
        - dns1
        - dns2
        - template
        - vm_password
        - fqdn_domain
        - domain_join_account
        - domain_join_password


    - name: Create a VM from a template
      vmware_guest:
        hostname: '{{ lookup("env", "VMWARE_HOST") }}'
        username: '{{ lookup("env", "VMWARE_USER") }}'
        password: '{{ lookup("env", "VMWARE_PASSWORD") }}'
        datacenter: "{{ datacenter }}"
        cluster: "{{ cluster }}"
        folder: "{{ folder }}"
        validate_certs: no
        name: "{{ vmname }}"
        template: "{{ template }}"
#        wait_for_ip_address: no
        datastore: "{{ datastore }}"
#        - name: Add NIC to VM
#          ovirt_nic:
#          state: present
#          vm: "{{ vmname }}"
#          name: "{{ vlan_name }}"
#          interface: vmxnet3
#         mac_address: 00:1a:4a:16:01:56
#          profile: ovirtmgmt
#          network: ovirtmgmt
        state: poweredon
        networks:
        - name: "{{ vlan_name }}"
          device_type: vmxnet3
          start_connected: yes
          ip: '{{ ip }}'
          netmask: "{{ netmask }}"
          gateway: "{{ gateway }}"
          dns_servers:
           - "{{dns1}}"
           - "{{dns2}}"
          wait_for_ip_address: yes

        customization:
          autologon: yes
          hostname: "{{ vmname }}"
          password: "{{ vm_password }}"
          domainadmin: "{{ domain_join_account }}"
          domainadminpassword: "{{ domain_join_password }}"
          joindomain: "{{ fqdn_domain }}"
          runonce:
          - C:\Windows\System32\cmd.exe /c "C:\Ansible_Workaround\domain_group.cmd"

      register: deploy_vm
      ignore_errors: yes

    - name: Result of Virtual machine
      debug:
        var: deploy_vm

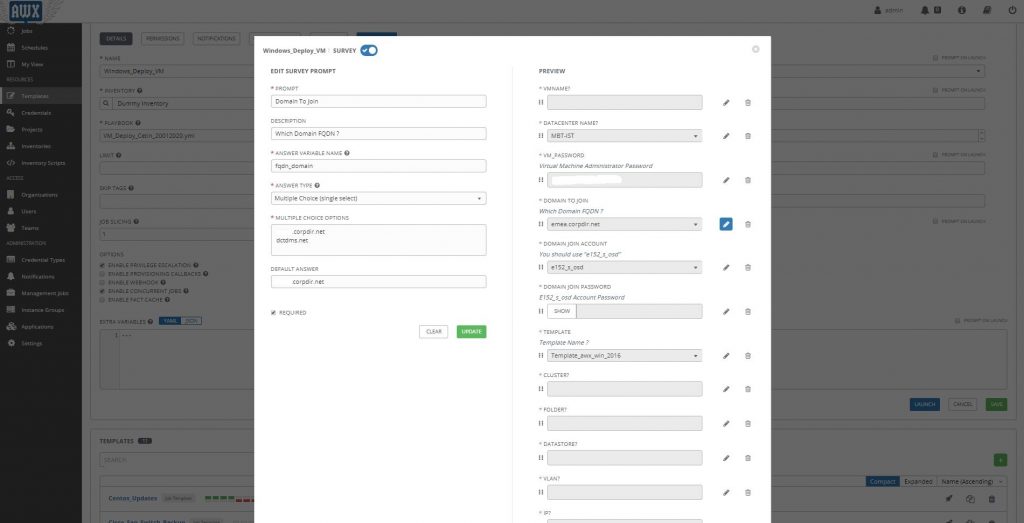
when you check the code you will see defined couple of variables in this code like ; datacenter,cluster,folder,ip,template etc..

We need the answer this variables at the AWX system. For this purpose we need to reedit the template and define  survey for it. Every step of this survey need to answer in the code.  for example “fqdn_domain” check the screenshot.

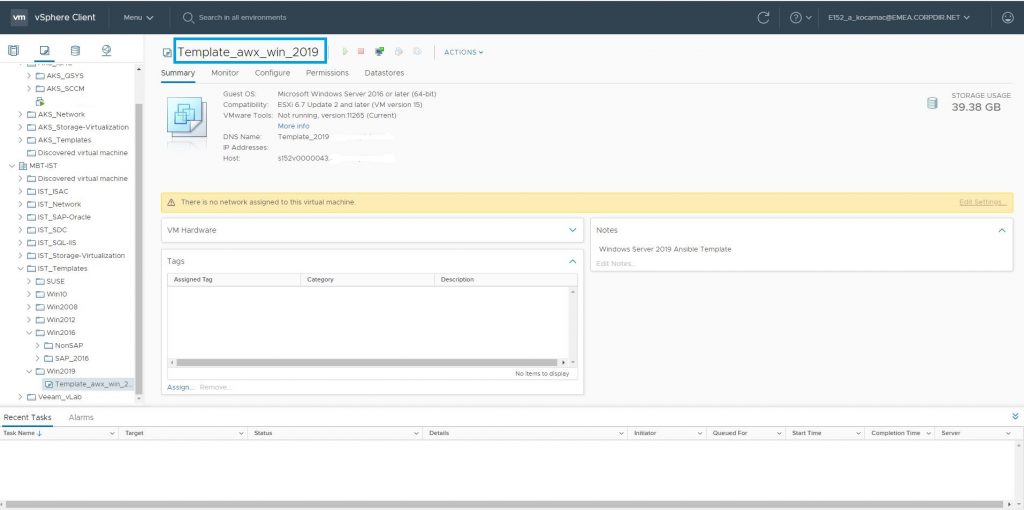
Now we need a Virtual Machine Template for the deployment usage. I have created many templates for this purpose for every Windows OS versions.

As you know ESX enviroment can generalize the cloned template to machine. We are triggering  this option automatically while cloning the machine.

The important point is in that template you need to install vmtools. Because awx tells the operation steps to  the esx, esx customizing the  Windows OS via vmtools.

On my environment I am not a domain admin group member. I am a member of specific OU admin group , that’s why I have put a small run ones script to template machine “C:\Ansible_Workaround\domain_group.cmd”

@echo off
net localgroup administrators domain\OU_Admins /ADD
TZUTIL /s "Turkey Standard Time"

Lets demonstrate a deployment;

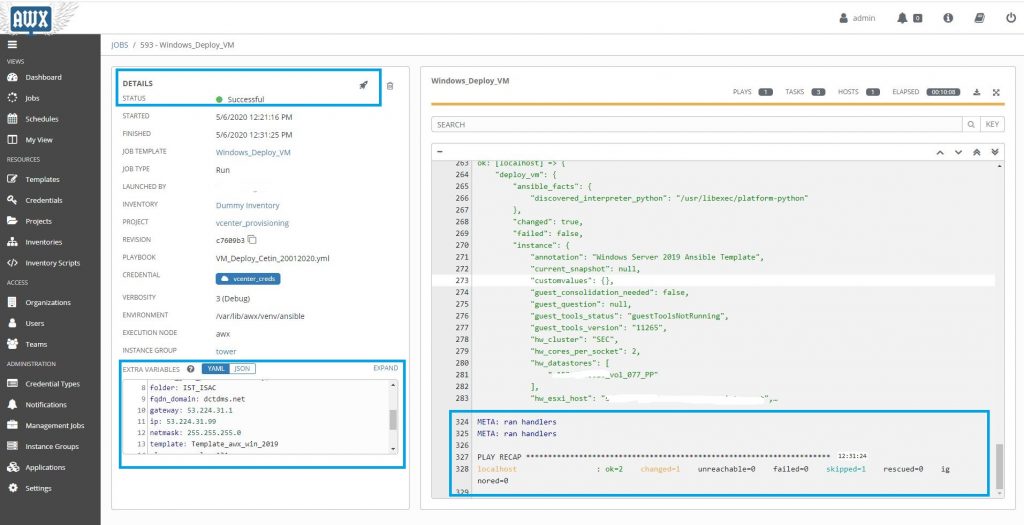
First go to template and check it ones more; If everything seems OK, press the rocket icon and start the deployment. Answer the questions about the VM name, Ip,Gateway,LocalAdmin Passwords etc.

After it click the deploy. It start to deploy and depend about your environment speed , it will take time about ten minutes.

If you success you will see a screen like that;

I hope , This document  will help you have an idea about the ansible AWX and Windows deployment process.

Conclusion ;

Ansible is a big sea in IT world. If you learn how to sail in it , you will find many automation variations for your daily job. For example; I am using it take Cisco Switch backups in every week more than hundred device. May be it will be another  story on this blog.

I would like to special thanks to my colleague Tolga Asik for his cooperation with his VM knowladge  and also Mustafa  Sarı with his storage knowledge.


New Project with Devops Chain Tools

Starting  to the Devops Journey

In April 2019, we initiated building a DevOps environment in our corporate while starting a new project.
I will give a short brief for every main actors in the DevOps chain and finally show the continuous delivery flow of our project.

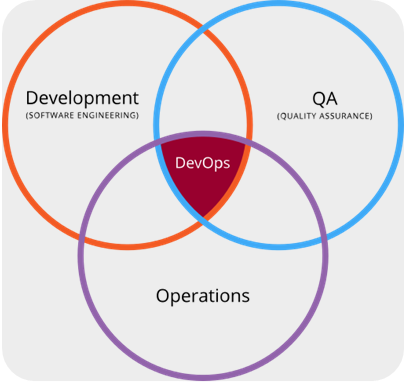
What is DevOps?

  • Is a set of software development practices
  • Combines software development and information technology operations to shorten the systems development life cycle
  • Delivering features, fixes, and updates frequently in close alignment with business objectives

Current DevOps Chain in our project:

A DevOps toolchain is a set or combination of tools that aid in the delivery, development, and management of software applications throughout the systems development life cycle, as coordinated by an organisation that uses DevOps practices. Below picture shows the actors in our project DevOps chain:

What is Jira?

Jira is a issue tracking product developed by Atlassian that allows bug tracking and agile project management.

  • Plan – Create user stories and issues, plan sprints, and distribute tasks across your software team
  • Track – Prioritize and discuss your team’s work in full context with complete visibility
  • Release – Ship with confidence and sanity knowing the information you have is always up-to-date.
  • Report – Improve team performance based on real-time, visual data that your team can put to use.

What is GitHub?

GitHub is a code hosting platform for collaboration and version control. GitHub lets you (and others) work together on projects.

What is Jenkins?

Jenkins is an open source automation server which helps to automate the non-human part of the software development process

  • building
  • testing
  • delivering or deploying

What is SonarQube?

SonarQube is the leading product for Continuous Code Quality which detects bugs, code smells, and security vulnerabilities on 20+ programming languages. With a Quality Gate in place(Jenkins), you can fix the leak and therefore improve code quality systematically.

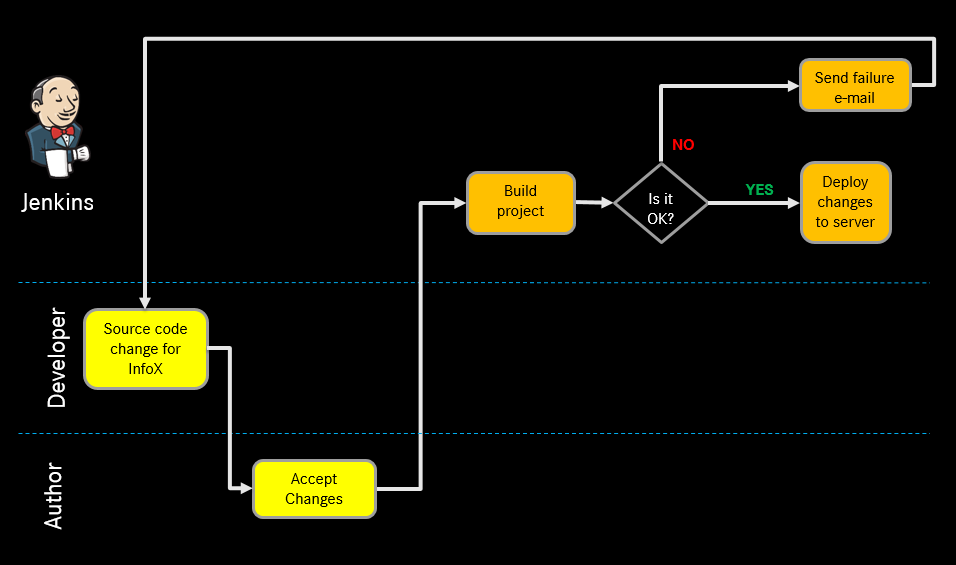
Project Continuous Delivery Flow

Continuous delivery automates the entire software release process. Every revision that is committed triggers an automated flow that builds, tests, and then stages the update. The final decision to deploy to a live production environment is triggered by the developer. Here is the flow prepared for Project:

We are planing to add the selenium test automation tool to our system and we will integrate it with Jenkins. I will share it soon.

In many thanks to for the contributions about it to Serhat Karataş.

AC for old Rusty Car with LPG Fuel System

Air Condition For My Old Model Car

I have been told you at my first warm hello post , I will also publish my ideas and engineering stuffs.  This story and the idea came to my mind with low income times. It was difficult times for me and for my family, now on that’s all history for us but, hard times needs specific solution with low costs.

My idea has been started with a old rusty car. I had to buy a an old car because it was the only one, I can afford.  I bought a Ford Escort 1990 Model MK3 Chases. It was my childhood dream car at high school times.

Yes it was old but it has been a real good condition for me 🙂

I bought it in February 2017, my kids are not very happy about it but (because of the view and old design.) that’s what I can do for now.

At winter everything’s  were fine, my car heater was working very good. We were enjoying the car advantages . Going to weekend vacations to near snowy places, family picnics etc… They have started to loving it.

Day by day summer was about the come and we have to keep it open our car windows, because it is getting hot, Hard times were coming up.

I need to find a way the keep cool inside of the car, but how ?

My car was using the liquid petroleum gas as fuel. Because LPG is much cheaper than gasoline in Turkey. Yes it comes with some of disadvantages to car but we have to deal with it. One liter gasoline price equal to almost tree liter of LPG.  In Turkey almost every gasoline fuel cars ( don’t have to be an old) uses this systems. As an example you can check this site .

Small Engineering Information;

LPG is storing with liquid form in a big tank at back site (trunk) of the car. But when you want to burn it in the engine you need to convert it to the gas form . For this purpose every LPG Systems has LPG regulators for it. Regulators have tree rooms inside. Two room for engine hot water , one room for LPG for change. If you have small physic knowledge, When the gasses are storing in liquid form , while the vaporizing operation it absorbs heat energy around it, That means LPG regulators without engine cooling water heat , can freeze to minus forty degrees (- 40 C ) because of the GAS vaporizing heat absorb.

If I can transfer that cold to inside of the car, it will solve all of my problems. But how ?

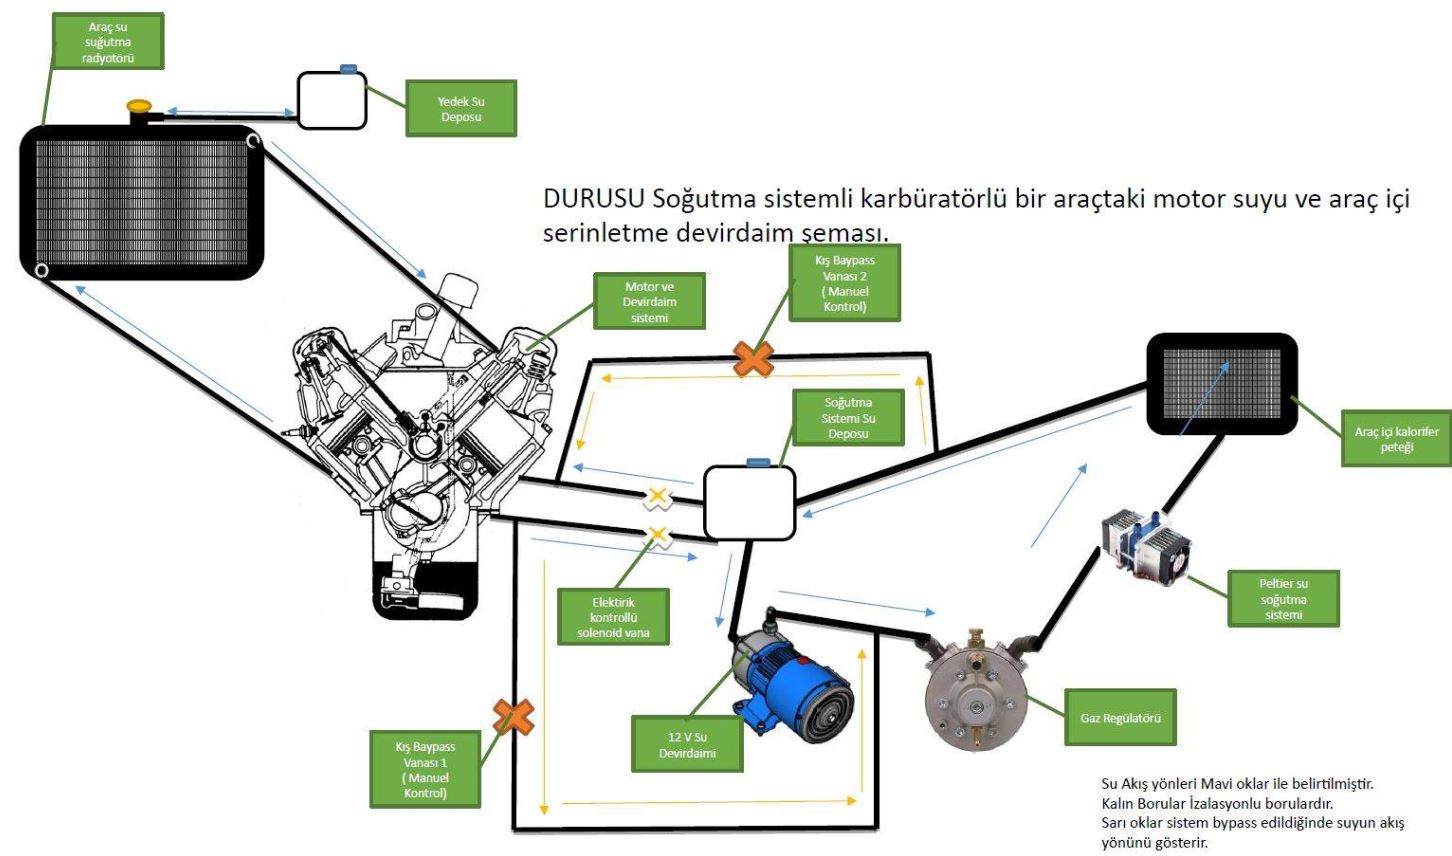
It was simple , I need to switch inside heat exchanger  water pipes to LPG Regulator, after it I need to make a water circulation between them with a small water pump.

My Tests ;

Heat exchanger will fill with cold water , It will absorb heat from car inside . It will get cold inside of the car.  The idea was simple. Now I need to try.

It was really hard to seal the water inside of the cooling system. Finding suitable parts, isolating the cold water from engine heat was my challenges.

after with many tries, tests. As I can say it seems working.

Test Results ;

At my test outside of the temperature was almost 34 C’ after LPG AC inside of the car was 25 C’. I don’t have a video or photos to prove it but all I can say, we went to a summer vacation with this car to Dalyan Turkey 🙂

Also I have publish it a Facebook group which is Türk Mucitler Klübü

Also you can increase the system cooling performances with Peltier water cooling module.

I believe  it will use full for someone 🙂 Because for me. It was !


Application Owners Self Service Solution

SelfService Application Administration on onpremise Enviroment

Infraself For The Application Owners

Hi ,

This time, I would like to tell you a small story about my application owners demands, request and a self service solution.

In my corporate company internal web site application owners stores their applications on-prem servers which I am in responsible infrastructure systems. Test, Development and Prod systems infrastructure are different but all of them on-prem. When the developers made some changes on the application configurations sometimes they can have a new code or updates about the application. They always came to me for the application service restart, application pool restart or even server restarts.

This is a annoying process for me and also for them. They are the responsible application but I have to take care of the application running status. Sometimes they can upload the wrong code or bugy codes. They need to update their codes and redeploy it to infrastructure (10) ten times in a day. That means I have to restart the services eleven (11) times in a day. No it was not  suitable  for  my working style !

In corporate rules application owners can’t have admin rights on any systems. So I need to find a solution for them and for my self.

I spoke to my manager about this process, he told me OK if you could find a suitable solution about it , he will gave me full support but with this conditions which are;

  1. With this solution they shouldn’t have  admin rights on any server,
  2. They shouldn’t have to have make a remote connection to any server,
  3. They could able to restart their own applications services or servers,
  4. On that systems every actions which they made ( restart , stop, start etc..) should be logged,
  5. They should not have get any admin rights user accounts information on that systems from any script or application.

So it seems a challenge, and yes Challenge Accepted !

What I got in my hands ;

  • All application working systems are Windows Servers versions,
  • All application owners willing to take care of the application full life cycle,
  •  Power shell scripts will be fine for all run windows operations.
  • Our MS licensing are giving me a freedom for all MS Products.

 How I solved my and application owners problem;

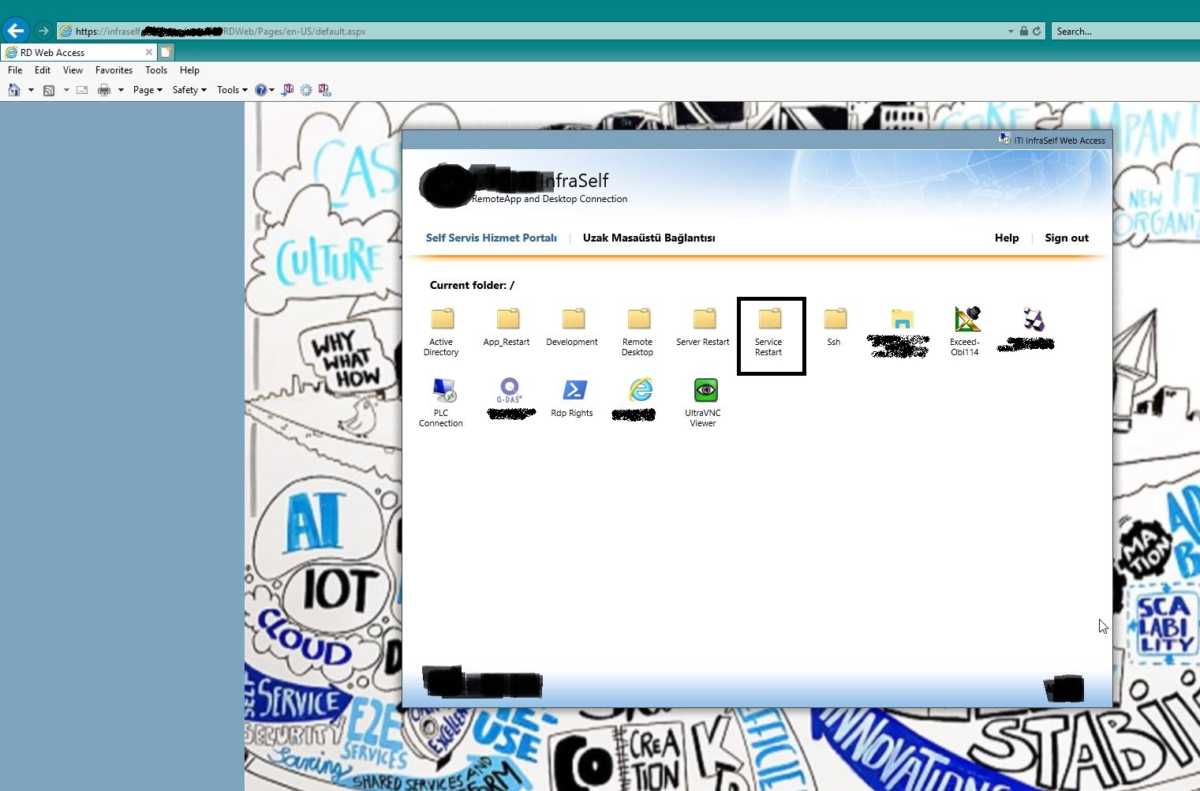
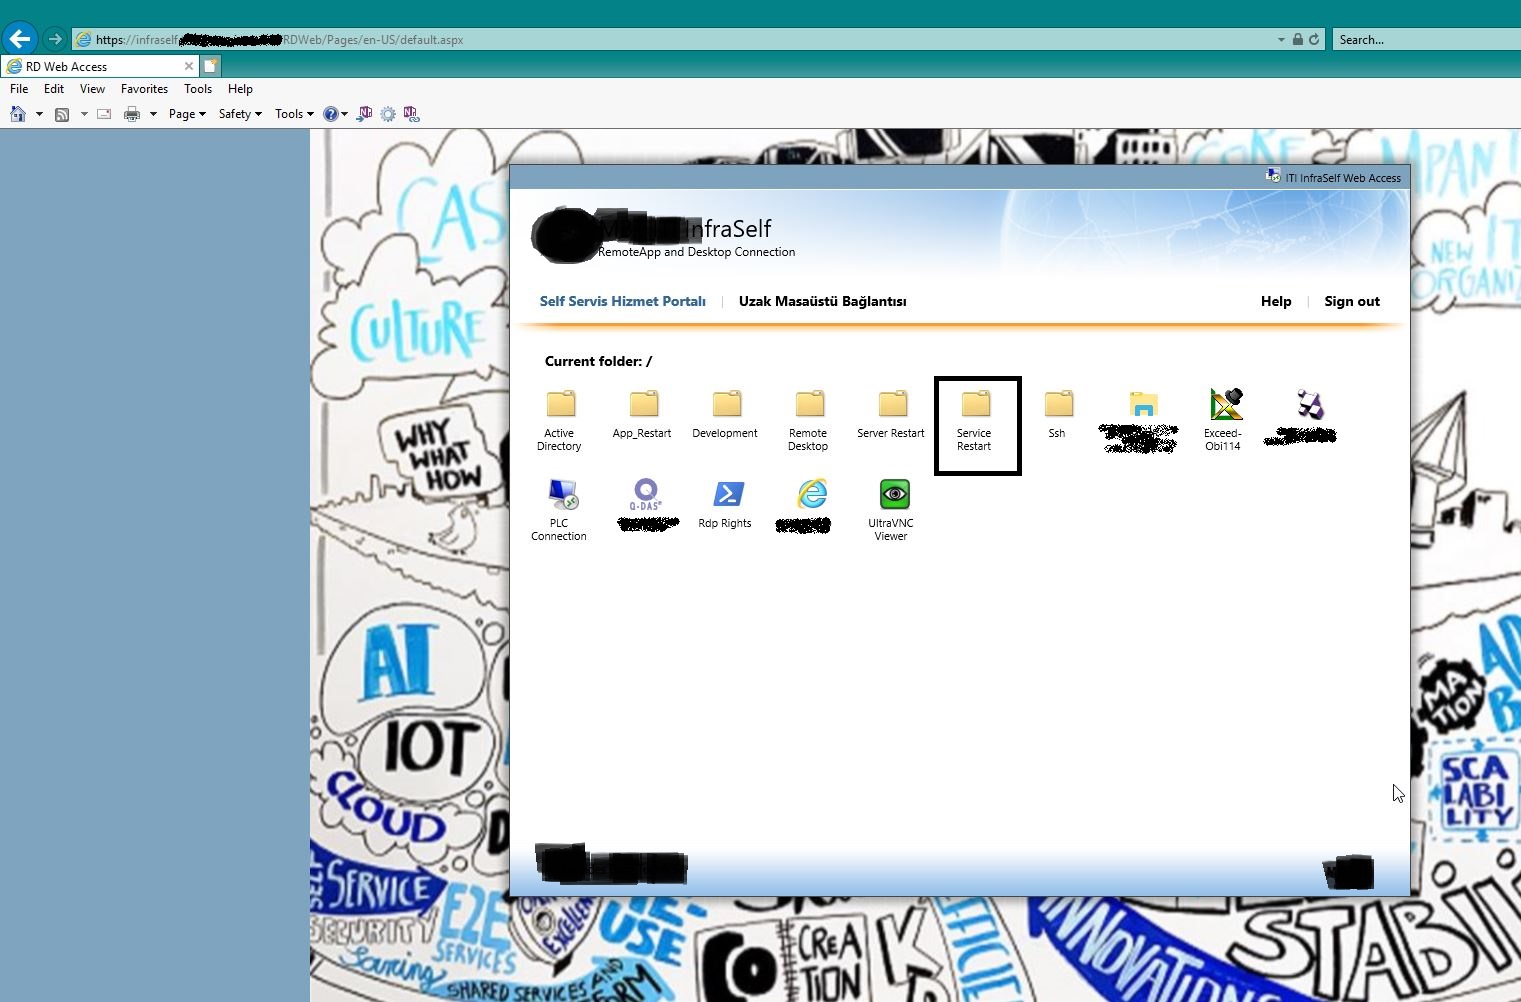
I have build a RDWeb Cluster systems for it. Two servers are accepting the connections with cluster build and they forwarding the RDP sessions to backend application sharing servers.  So with this operation users don’t know the RDP Servers. I have shared the Poweshell scripts via  RDWeb.

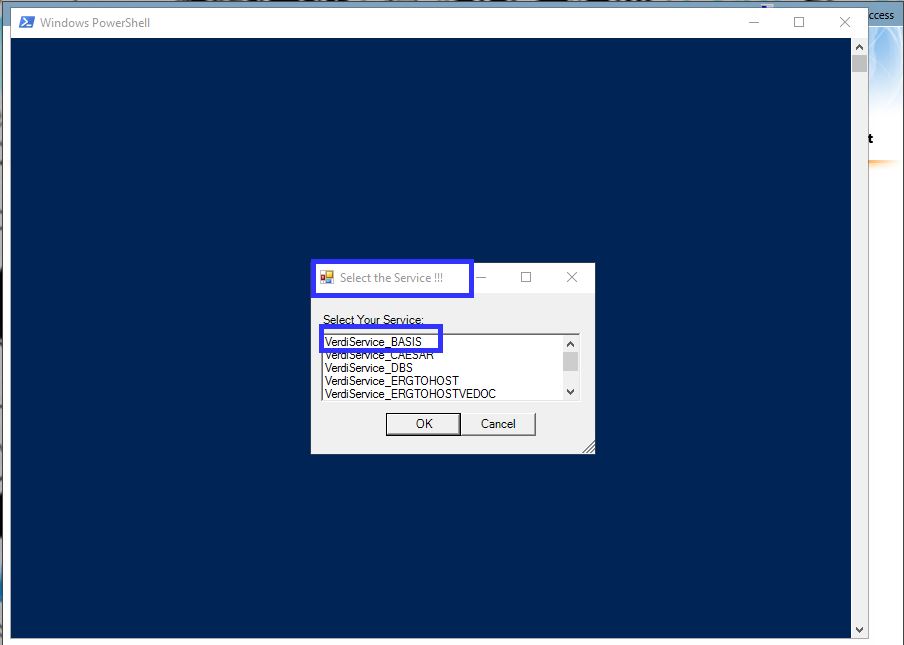
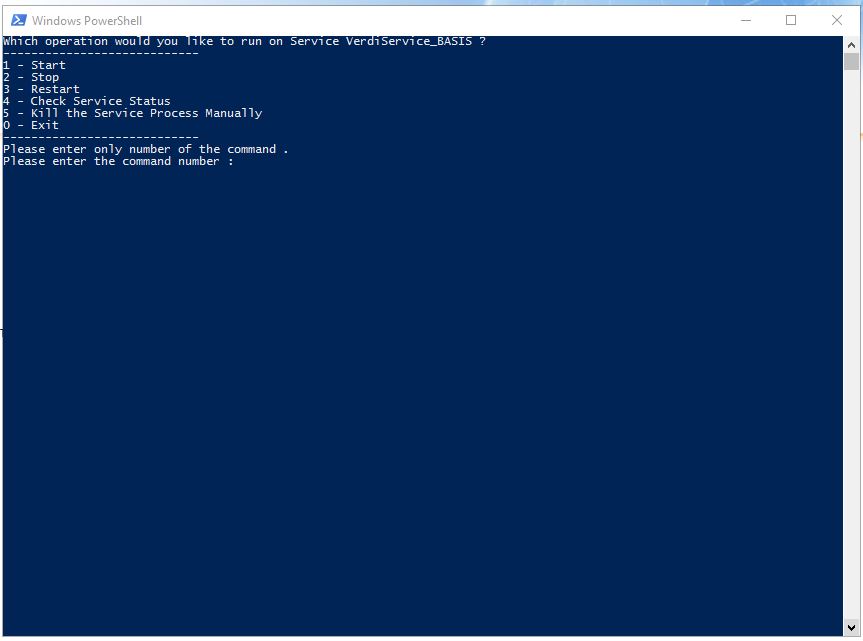
When users logon to RDWeb , if any powershell script shared with the user. Users can see the script. When click on the script , script is start to run on backend application server, so users can not see the script meta. I have sold the rest of the problems in side of the Powershell whic it was the easy part.

Here is the service restart script;

# Service Restart Script.
CLS
Function pause ($message)
{
# Check if running Powershell ISE
if ($psISE)
{
Add-Type -AssemblyName System.Windows.Forms
[System.Windows.Forms.MessageBox]::Show("$message")
}
else
{
Write-Host "$message" -ForegroundColor Darkgreen
$x = $host.ui.RawUI.ReadKey("NoEcho,IncludeKeyDown")
}
}

$Currentuser = [System.Security.Principal.WindowsIdentity]::GetCurrent().Name
$Username = 'Admin or service User Info'
$Password = 'Admin or service User Password'
$pass = ConvertTo-SecureString -AsPlainText $Password -Force
$SecureString = $pass
# Users you password securly
$MySecureCreds = New-Object -TypeName System.Management.Automation.PSCredential -ArgumentList $Username,$SecureString 
filter timestamp {"$(Get-Date -Format G): $_"}
$owner = 'App server_Service_Restart Script'
$ServerName = 'Application Server Hostname'
$LogPath = '\\Shared\Log Path\to every\application sharing \_Restart.log'
$To = "application owner email"
$From = "from email"
$Subject = "Service Status Info"
$Cc = "monitoring team email grup"
$SmtpServer = "SMTP Server hostname"
$JobTime = Get-Date

Add-Type -AssemblyName System.Windows.Forms
Add-Type -AssemblyName System.Drawing

$form = New-Object System.Windows.Forms.Form
$form.Text = 'Select the Service !!!'
$form.Size = New-Object System.Drawing.Size(300,200)
$form.StartPosition = 'CenterScreen'

$OKButton = New-Object System.Windows.Forms.Button
$OKButton.Location = New-Object System.Drawing.Point(75,120)
$OKButton.Size = New-Object System.Drawing.Size(75,23)
$OKButton.Text = 'OK'
$OKButton.DialogResult = [System.Windows.Forms.DialogResult]::OK
$form.AcceptButton = $OKButton
$form.Controls.Add($OKButton)

$CancelButton = New-Object System.Windows.Forms.Button
$CancelButton.Location = New-Object System.Drawing.Point(150,120)
$CancelButton.Size = New-Object System.Drawing.Size(75,23)
$CancelButton.Text = 'Cancel'
$CancelButton.DialogResult = [System.Windows.Forms.DialogResult]::Cancel
$form.CancelButton = $CancelButton
$form.Controls.Add($CancelButton)

$label = New-Object System.Windows.Forms.Label
$label.Location = New-Object System.Drawing.Point(10,20)
$label.Size = New-Object System.Drawing.Size(280,20)
$label.Text = 'Select Your Service:'
$form.Controls.Add($label)

$listBox = New-Object System.Windows.Forms.ListBox
$listBox.Location = New-Object System.Drawing.Point(10,40)
$listBox.Size = New-Object System.Drawing.Size(260,20)
$listBox.Height = 80

[void] $listBox.Items.Add('Service Name 1')
[void] $listBox.Items.Add('Service Name 2')
[void] $listBox.Items.Add('Service Name 2')
[void] $listBox.Items.Add('Service Name 2')
[void] $listBox.Items.Add('Service Name 2')

$form.Controls.Add($listBox)

$form.Topmost = $true

$result = $form.ShowDialog()

While ($true) {

if ($result -eq [System.Windows.Forms.DialogResult]::OK)

{
$x = $listBox.SelectedItem

$ITMessage = "If you have a trouble on $x please contact with ITI."


Write-Host Which operation would you like to run on Service $x ?
Write-Host ----------------------------
Write-Host 1 - Start 
Write-Host 2 - Stop
Write-Host 3 - Restart
Write-Host 4 - Check Service Status
Write-Host 5 - Kill the Service Process Manually
Write-Host 0 - Exit
Write-Host ----------------------------
Write-Host Please enter only number of the command . 
}

$command = Read-Host -Prompt 'Please enter the command number '

If ($command -eq 1) {

$sonuc = Invoke-command -credential $MySecureCreds -ComputerName $ServerName -ScriptBlock {param ($x) (Start-Service -InputObject $x -PassThru | select Status,Name,PSComputerName) } -ArgumentList $x
Write-Host $sonuc -ForegroundColor Green
Send-MailMessage -To $to -From $from -Cc $Cc -Subject $subject -Body "$x Service is started by $Currentuser via $owner at $JobTime on $ServerName " -SmtpServer $SmtpServer
Write-Output "$x Service is started by $Currentuser via $owner $ServerName"| timestamp >> $LogPath
Write-Host $ITMessage
pause "Press any key to continue"
CLS
}

ElseIf ($command -eq 2) {

$sonuc = Invoke-command -credential $MySecureCreds -ComputerName $ServerName -ScriptBlock {param ($x) (Stop-service -inputObject $x -PassThru | select Status,Name,PSComputerName) } -ArgumentList $x
Write-Host $sonuc -ForegroundColor Green
Send-MailMessage -To $to -From $from -Cc $Cc -Subject $subject -Body "$x Service is stoped by $Currentuser via $owner at $JobTime on $ServerName " -SmtpServer $SmtpServer
Write-Output "$x Service is stoped by $Currentuser via $owner on $ServerName"| timestamp >> $LogPath
Write-Host $ITMessage
pause "Press any key to continue"
CLS
}

ElseIf ($command -eq 3) {

$sonuc = Invoke-command -credential $MySecureCreds -ComputerName $ServerName -ScriptBlock {param ($x) (Restart-Service -inputObject $x -PassThru | select Status,Name,PSComputerName) } -ArgumentList $x
Write-Host $sonuc -ForegroundColor Green
Send-MailMessage -To $to -From $from -Cc $Cc -Subject $subject -Body "$x Service is restarted by $Currentuser via $owner at $JobTime on $ServerName" -SmtpServer $SmtpServer
Write-Output "$x Service is restarted by $Currentuser via $owner on $ServerName"| timestamp >> $LogPath
Write-Host $ITMessage
pause "Press any key to continue"
CLS
}

ElseIf ($command -eq 4) {

$sonuc = Invoke-command -credential $MySecureCreds -ComputerName $ServerName -ScriptBlock {param ($x) (Get-Service -inputObject $x | select -Property Status,Name,PSComputerName)} -ArgumentList $x
Write-Host $sonuc -ForegroundColor Green
Send-MailMessage -To $to -From $from -Cc $Cc -Subject $subject -Body "$x Service is checked by $Currentuser via $owner at $JobTime on $ServerName" -SmtpServer $SmtpServer
Write-Output "$x Service is checked by $Currentuser via $owner on $ServerName"| timestamp >> $LogPath
Write-Host $ITMessage
pause "Press any key to continue"
CLS
}

ElseIf ($command -eq 5) {

$id = Get-WmiObject -computername $Servername -credential $MySecureCreds -Class Win32_Service -Filter "Name LIKE '$x'" | Select-Object -ExpandProperty ProcessId
$procname = Invoke-command -credential $MySecureCreds -ComputerName $ServerName -ScriptBlock {param ($id) Get-Process -id $id |Select-Object -ExpandProperty Processname} -ArgumentList $id 
Write-Host $x Service Process Name is $procname and the process is killing now.
Invoke-command -credential $MySecureCreds -ComputerName $ServerName -ScriptBlock {param ($procname)get-process $procname | Stop-Process -Force -PassThru} -ArgumentList $procname
Write-Host $procname is killed and $x service is need to start again. -ForegroundColor Green 
Send-MailMessage -To $to -From $from -Cc $Cc -Subject $subject -Body "$x Service process is killed by $Currentuser via $owner at $JobTime on $ServerName " -SmtpServer $SmtpServer
Write-Output "$x Service process is killed by $Currentuser via $owner on $ServerName"| timestamp >> $LogPath
Write-Host $ITMessage
pause "Press any key to continue"
CLS
}

ElseIf ($command -eq 0) {
CLS
Exit
}

Else {
Write-Host "Please enter only number of the command !!! " -ForegroundColor Red
}
}
#App pool Restart Script
CLS
Function pause ($message)
{
# Check if running Powershell ISE
if ($psISE)
{
Add-Type -AssemblyName System.Windows.Forms
[System.Windows.Forms.MessageBox]::Show("$message")
}
else
{
Write-Host "$message" -ForegroundColor Darkgreen
$x = $host.ui.RawUI.ReadKey("NoEcho,IncludeKeyDown")
}
}

$Currentuser = [System.Security.Principal.WindowsIdentity]::GetCurrent().Name
$Username = 'Admin or Service Account'
$Password = 'Password of Admin or Service Account'
$pass = ConvertTo-SecureString -AsPlainText $Password -Force
$SecureString = $pass
# Users you password securly
$MySecureCreds = New-Object -TypeName System.Management.Automation.PSCredential -ArgumentList $Username,$SecureString 
filter timestamp {"$(Get-Date -Format G): $_"}
$owner = 'Log Name '
$ServerName = 'IIS Server Hostname'
$LogPath = 'Log full path \\share\logs\apppool_restart.log'
$To = "apppool owner email"
$From = "[email protected]"
$Subject = "Service Status Info"
$Cc = "monitoring team email"
$SmtpServer = "smtp server hostname or fqdn"
$JobTime = Get-Date

Add-Type -AssemblyName System.Windows.Forms
Add-Type -AssemblyName System.Drawing

$form = New-Object System.Windows.Forms.Form
$form.Text = 'Please select App !!!'
$form.Size = New-Object System.Drawing.Size(300,200)
$form.StartPosition = 'CenterScreen'

$OKButton = New-Object System.Windows.Forms.Button
$OKButton.Location = New-Object System.Drawing.Point(75,120)
$OKButton.Size = New-Object System.Drawing.Size(75,23)
$OKButton.Text = 'OK'
$OKButton.DialogResult = [System.Windows.Forms.DialogResult]::OK
$form.AcceptButton = $OKButton
$form.Controls.Add($OKButton)

$CancelButton = New-Object System.Windows.Forms.Button
$CancelButton.Location = New-Object System.Drawing.Point(150,120)
$CancelButton.Size = New-Object System.Drawing.Size(75,23)
$CancelButton.Text = 'Cancel'
$CancelButton.DialogResult = [System.Windows.Forms.DialogResult]::Cancel
$form.CancelButton = $CancelButton
$form.Controls.Add($CancelButton)

$label = New-Object System.Windows.Forms.Label
$label.Location = New-Object System.Drawing.Point(10,20)
$label.Size = New-Object System.Drawing.Size(280,20)
$label.Text = 'IIS AppPool Select:'
$form.Controls.Add($label)

$listBox = New-Object System.Windows.Forms.ListBox
$listBox.Location = New-Object System.Drawing.Point(10,40)
$listBox.Size = New-Object System.Drawing.Size(260,20)
$listBox.Height = 80

[void] $listBox.Items.Add('Web App Pool 1')
[void] $listBox.Items.Add('Web App Pool 2')
[void] $listBox.Items.Add('Web App Pool 3')
[void] $listBox.Items.Add('Web App Pool 4')
[void] $listBox.Items.Add('Web App Pool 5')
[void] $listBox.Items.Add('Web App Pool 6')


$form.Controls.Add($listBox)

$form.Topmost = $true

$result = $form.ShowDialog()

While ($true) {

if ($result -eq [System.Windows.Forms.DialogResult]::OK)

{
$x = $listBox.SelectedItem 

$ITMessage = "If you have a trouble on $x please contact with ITI."

Write-Host Which operation would you like to run on AppPool $x ?
Write-Host ----------------------------
Write-Host 1 - Start 
Write-Host 2 - Stop
Write-Host 3 - Restart
Write-Host 4 - Check Apppool status
Write-Host 0 - Exit
Write-Host ----------------------------
Write-Host Please enter only number of the command . 
}

$command = Read-Host -Prompt 'Please enter the command number '

If ($command -eq 1) {

$sonuc = Invoke-command –credential $MySecureCreds -ComputerName $ServerName -ScriptBlock {param ($x) (C:\Windows\System32\inetsrv\appcmd.exe start apppool "$x" ) } -ArgumentList $x
Write-Host $sonuc -ForegroundColor Green
end-MailMessage -To $to -From $from -Cc $Cc -Subject $subject -Body "$x App Pool is started by $Currentuser via $owner at $JobTime " -SmtpServer $SmtpServer
Write-Output "$x App Pool is started by $Currentuser via $owner"| timestamp >> $LogPath
Write-Host $ITMessage
pause "Press any key to continue"
CLS
}

ElseIf ($command -eq 2) {

$sonuc = Invoke-command –credential $MySecureCreds -ComputerName $ServerName -ScriptBlock {param ($x) (C:\Windows\System32\inetsrv\appcmd.exe stop apppool "$x" ) } -ArgumentList $x
Write-Host $sonuc -ForegroundColor Green
Send-MailMessage -To $to -From $from -Cc $Cc -Subject $subject -Body "$x App Pool is stoped by $Currentuser via $owner at $JobTime " -SmtpServer $SmtpServer
Write-Output "$x App Pool is stoped by $Currentuser via $owner"| timestamp >> $LogPath
Write-Host $ITMessage
pause "Press any key to continue"
CLS
}

ElseIf ($command -eq 3) {

$sonuc = Invoke-command –credential $MySecureCreds -ComputerName $ServerName -ScriptBlock {param ($x) (C:\Windows\System32\inetsrv\appcmd.exe recycle apppool "$x" ) } -ArgumentList $x
Write-Host $sonuc -ForegroundColor Green
Send-MailMessage -To $to -From $from -Cc $Cc -Subject $subject -Body "$x App Pool is restarted by $Currentuser via $owner at $JobTime " -SmtpServer $SmtpServer
Write-Output "$x App Pool is restarted by $Currentuser via $owner"| timestamp >> $LogPath
Write-Host $ITMessage
pause "Press any key to continue"
CLS
}

ElseIf ($command -eq 4) {

$sonuc = Invoke-command –credential $MySecureCreds -ComputerName $ServerName -ScriptBlock {param ($x) (C:\Windows\System32\inetsrv\appcmd.exe list apppool "$x" /text:state )} -ArgumentList $x
Write-Host $sonuc -ForegroundColor Green
Send-MailMessage -To $to -From $from -Cc $Cc -Subject $subject -Body "$x App Pool is checked by $Currentuser via $owner at $JobTime " -SmtpServer $SmtpServer
Write-Output "$x App Pool is checked by $Currentuser via $owner"| timestamp >> $LogPath
Write-Host $ITMessage
pause "Press any key to continue"
CLS
}

ElseIf ($command -eq 0) {
CLS
Exit
}

Else {
Write-Host "Please enter only number of the command !!! " -ForegroundColor Red
}
}

If you are familiar with powershell, I belive , I don’t need to explain the scripts steps.

With this powershell script they can able restart their own applications system services or web app pools . It is easy and simple solution for all of us.

In other hand that means less admin effort for me 🙂

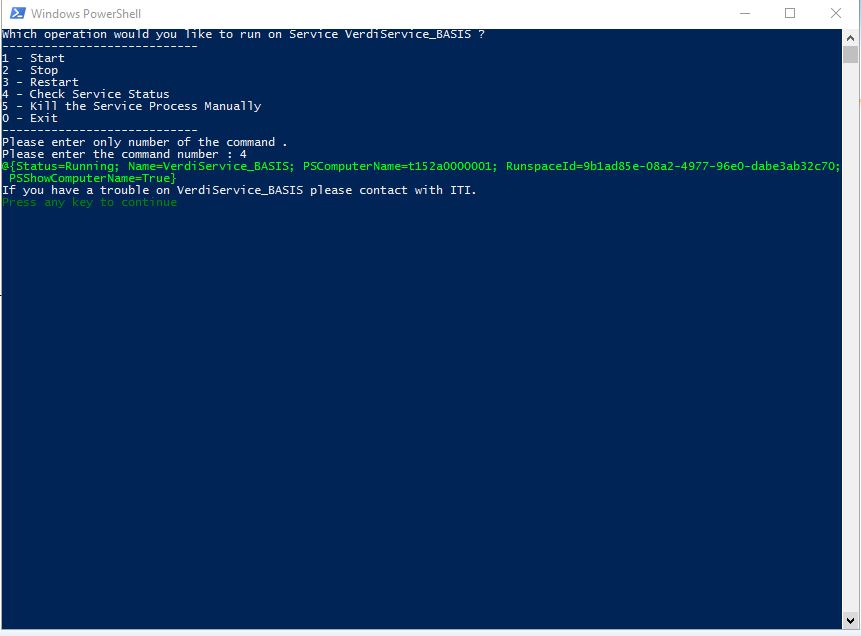
Let me show you an example ;


Log Management Solution with Elasticsearch, Logstash, Kibana and Grafana

Log management solution for custom application

What I need it , How I did it;

Hello all ,

I would like to share a solution which I build for my application team’s software’s log management.

They came to me and told me, they were looking for a solution; Their applications creates custom logs and that logs store on Windows Machine drive. They need a tool for the monitor all different log files, when a specific error occurs (key word) they were requesting an email about it. Also they want to see the how many log creating in the system and need to see in graph visualization.

In Infrastructure team we have using many monitoring tools for that kind of purpose but, none of them can understand the unstructured log files, I mean application based log structure. Yes they can understand the windows events or Linux messages logs but this time it was different. This log files was unstructured for  our monitoring application tools.

So I have start to looking for a solution about it. After small search in the internet I have found the tool . It is Elasticsearch, Logstash and Kibana  known name with Elastic-Stack .

I have download the product installed on a test server. It was great , I was happy because I have stored the logs in elasticsearch, parsed with logstash, read and collected with filebeat. I could easily querying the logs with Kibana (Web interface) . Now it comes to create alarms for the error keywords . What  ?, How !  Elastic.co asking money for this. This options only available in non free versions of it.

Yes, I am working at a big corporate company but now on these days, Management is telling us find a free and opensource versions for software’s .  Even they have motto about it. 🙂

In other hand we had also lot’s of monitoring tools, for this purpose we could buy a license for the text monitoring addon. So I have to solve it Free and Open Source.

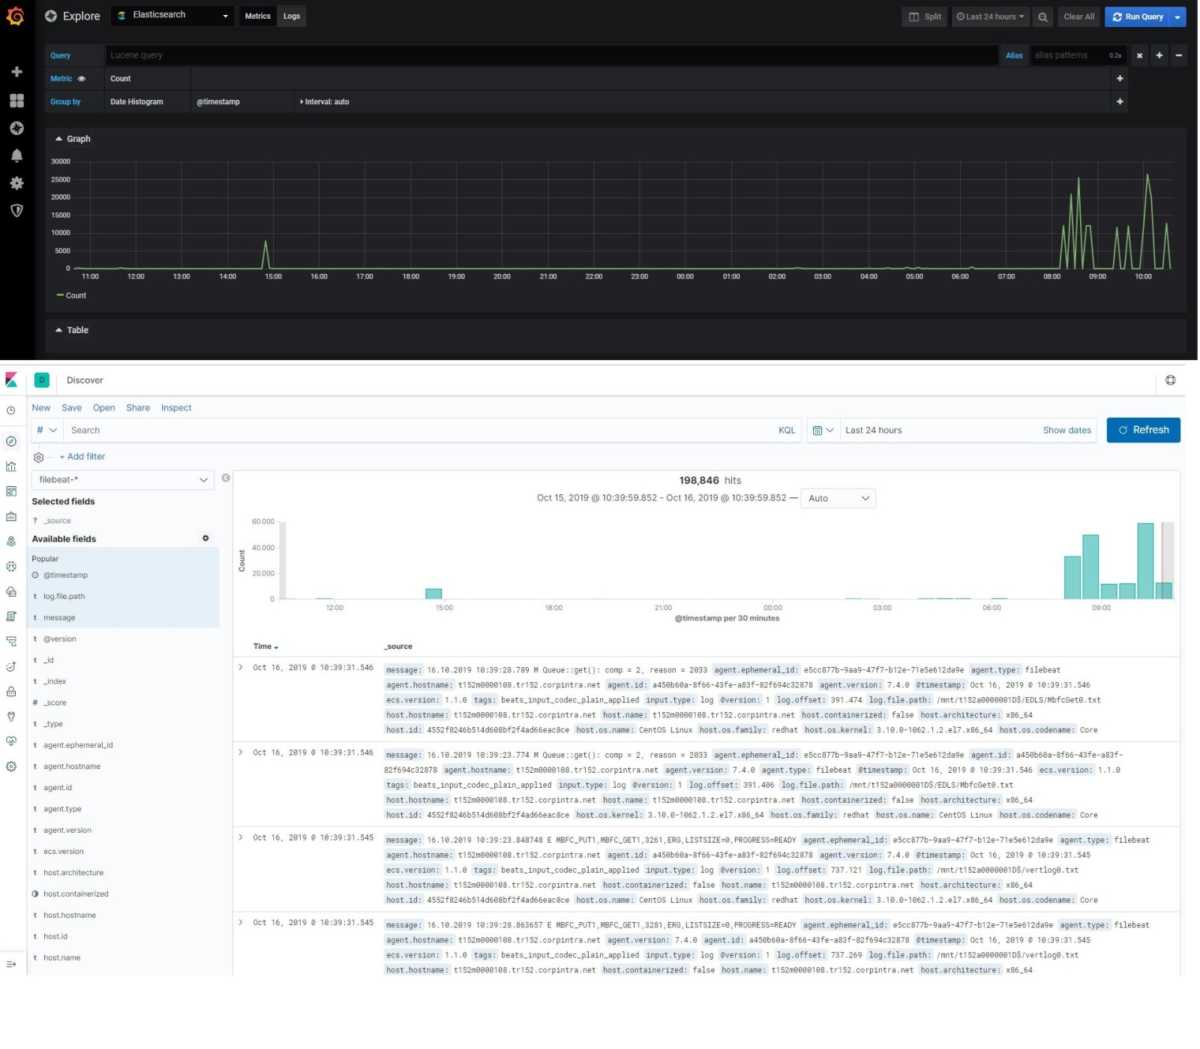
I couldn’t give up the elasticsearch, because it was so easy the configure and very easy to see the visualizations of the logs. I have start the digging the internet again.  Yes I have found an other solution for it;   Grafana

With this free and opensource tool, I got fancy graph and alerting system about my logs. Yes eureka…I have solved . Now I would like to show you step by step,  how to do that.

Installation Steps;

I have install a clean  Centos 7.6 on a test machine.  After it I have install the epel repo on that system.

  • sudo yum install epel-release
  • sudo yum update
  • sudo su -

Now I need to install the elastic repos for the elastic installations.

  • cd /etc/yum.repos.d/
  • vim elasticsearch.repo
[elasticsearch-7.x]
name=Elasticsearch repository for 7.x packages
baseurl=https://artifacts.elastic.co/packages/7.x/yum
gpgcheck=1
gpgkey=https://artifacts.elastic.co/GPG-KEY-elasticsearch
enabled=1
autorefresh=1
type=rpm-md
  • vim kibana.repo
[kibana-7.x]
name=Kibana repository for 7.x packages
baseurl=https://artifacts.elastic.co/packages/7.x/yum
gpgcheck=1
gpgkey=https://artifacts.elastic.co/GPG-KEY-elasticsearch
enabled=1
autorefresh=1
type=rpm-md
  • vim logstash.repo
[logstash-7.x]
name=Elastic repository for 7.x packages
baseurl=https://artifacts.elastic.co/packages/7.x/yum
gpgcheck=1
gpgkey=https://artifacts.elastic.co/GPG-KEY-elasticsearch
enabled=1
autorefresh=1
type=rpm-md
  • vim grafana.repo
[grafana]
name=grafana
baseurl=https://packages.grafana.com/oss/rpm
repo_gpgcheck=1
enabled=1
gpgcheck=1
gpgkey=https://packages.grafana.com/gpg.key
sslverify=1
sslcacert=/etc/pki/tls/certs/ca-bundle.crt

Elastic products needs OpenJDK to workout, for this purpose I decided to use Amazon Corretto 8 for the Open JDK

  • wget https://d3pxv6yz143wms.cloudfront.net/8.222.10.1/java-1.8.0-amazon-corretto-devel-1.8.0_222.b10-1.x86_64.rpm
  • yum install java-1.8.0-amazon-corretto-devel-1.8.0_222.b10-1.x86_64.rpm

Now I can install the all other tools.

  • yum install elasticsearch kibana logstash filebeat grafana nginx cifs-utils -y
systemctl start elasticsearch.service

systemctl enable elasticsearch.service

systemctl status elasticsearch.service


systemctl enable kibana

systemctl start kibana

systemctl status kibana

All elastic products are listening localhost (127.0.0.1)

  • cd /etc/nginx/conf.d
  • vim serverhostname.conf
server {
listen 80;

server_name servername.serverdomain.local;

auth_basic "Restricted Access";
auth_basic_user_file /etc/nginx/htpasswd.users;

location / {
proxy_pass http://localhost:5601;
proxy_http_version 1.1;
proxy_set_header Upgrade $http_upgrade;
proxy_set_header Connection 'upgrade';
proxy_set_header Host $host;
proxy_cache_bypass $http_upgrade;
  }
}

On my system I have used the nginx as revers proxy and basic password authentication for the basic web site security.

I need to edit /etc/nginx/htpasswd.users file for the encrypted user and password info.

I have created the file via this web site for my users. You can use your own choices.

  • cd /etc/nginx/
  • vim htpasswd.users
admin:$apr1$1bdToKFy$0KYSsCviSpvcCzN9w1km.0
  • systemctl enable nginx
    
    systemctl start nginx
    
    systemctl status nginx

My private test server also in my private network so, decided not to use local firewall and selinux policies.

  • systemctl stop firewalld
    
    systemctl disable firewalld
    
    systemctl status firewalld
  • vim /etc/selinux/config
# This file controls the state of SELinux on the system.
# SELINUX= can take one of these three values:
# enforcing - SELinux security policy is enforced.
# permissive - SELinux prints warnings instead of enforcing.
# disabled - No SELinux policy is loaded.
SELINUX=disabled
# SELINUXTYPE= can take one of three values:
# targeted - Targeted processes are protected,
# minimum - Modification of targeted policy. Only selected processes are protected.
# mls - Multi Level Security protection.
SELINUXTYPE=targeted
  • reboot

On my system logs file storing on a windows server local disk. I need a find a way to access on that therefor  I have decided to mount the smb share on my local system.

  • vim /root/share_smb_creds
username=log_user
password=SecurePassword
  • useradd -u 5000 log_user
    
  • groupadd -g 6000 logs
usermod -G logs -a log_user
usermod -G logs -a kibana
usermod -G logs -a elasticsearch
usermod -G logs -a logstash
vim /etc/fstab
\\\\s152a0000246\\c$\\App_Log_Files /mnt/logs cifs credentials=/root/share_smb_creds,uid=5000,gid=6000 0 0


reboot

The point about the all elasticsearch products configuration files are YAML formated  so please you need to be careful about the conf format and yml files formats.

  • cd /etc/logstash/conf.d
  • vim 02-beats-input.conf
input {
beats {
port => 5044
   }
}
  • vim 30-elasticsearch-output.conf
output {
elasticsearch {
hosts => ["localhost:9200"]
manage_template => false
index => "%{[@metadata][beat]}-%{[@metadata][version]}-%{+YYYY.MM.dd}"
   }
}
  • systemctl enable logstash
  • systemctl start logstash
  • systemctl status logstash
  • vim /etc/filebeat/filebeat.yml
filebeat.inputs:
- type: log
paths:
- /mnt/logs/*.txt


output.logstash:
hosts: ["localhost:5044"]
systemctl enable filebeat
systemctl start filebeat 
systemctl status filebeat -l

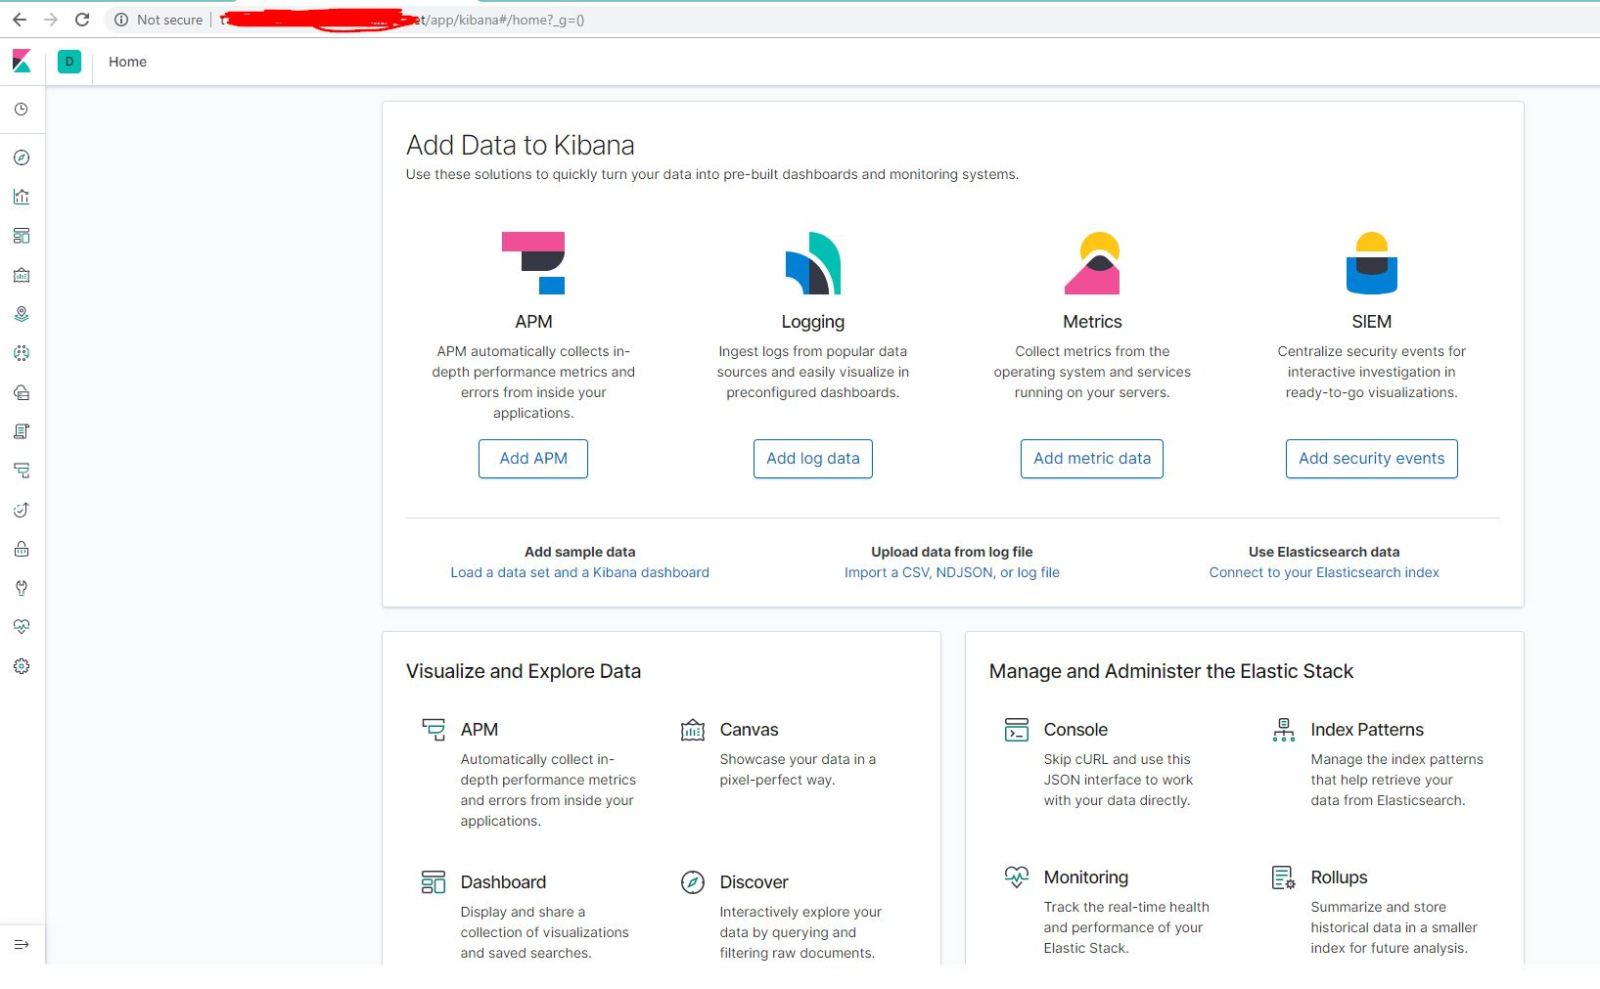
If every things success you can connect to kibana web interface and you can able to manage your elasticsearch system.

Kibana ports is listening localhost:5601 but what we have done; setup the nginx for the revers proxy. When connection comes to nginx , nginx will ask a username and password, if you pass it success, you connection will forward it to kibana.

Off course you need to research about the graphs and visualizations, these are only basic movements.

Now on we can run the Grafana.

systemctl enable grafana-server
systemctl start grafana-server
systemctl status grafana-server

You can connect to grafana with your browser http://servername:3000

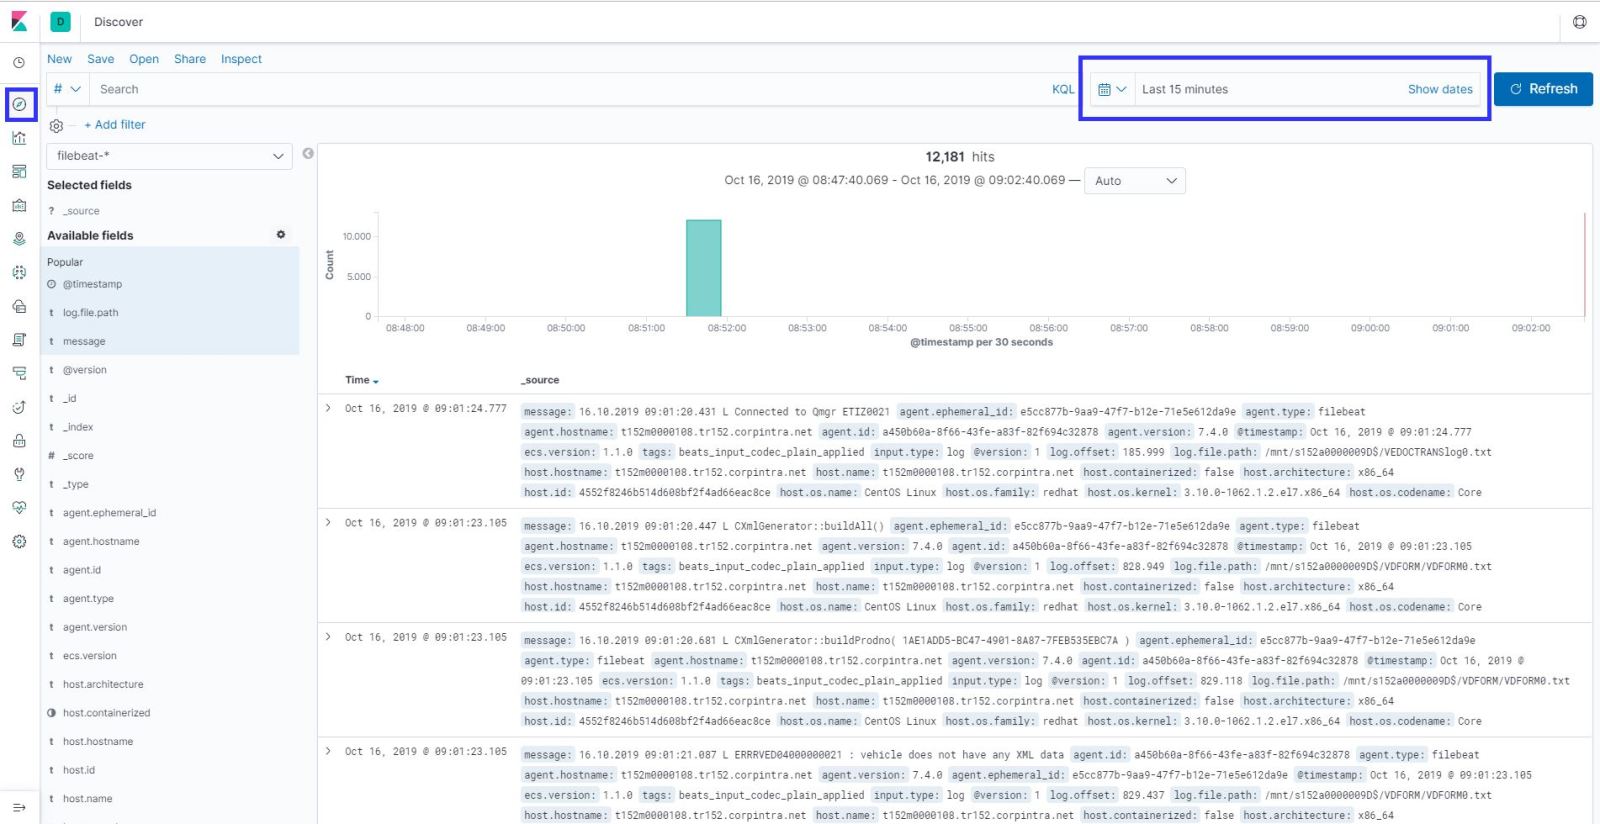
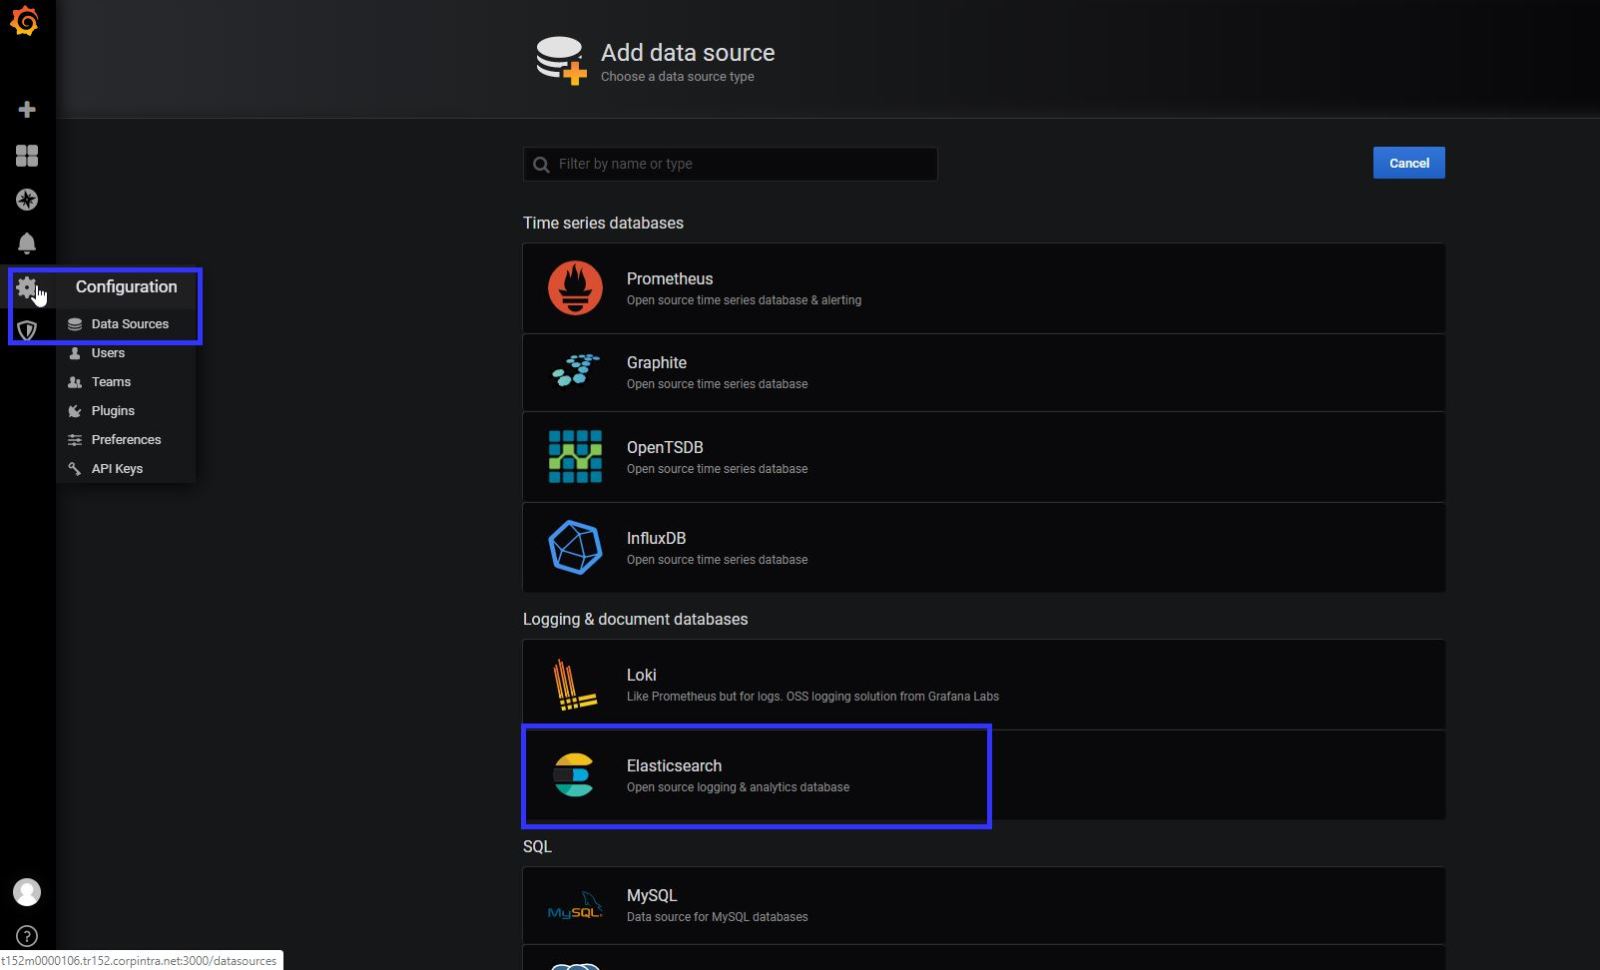
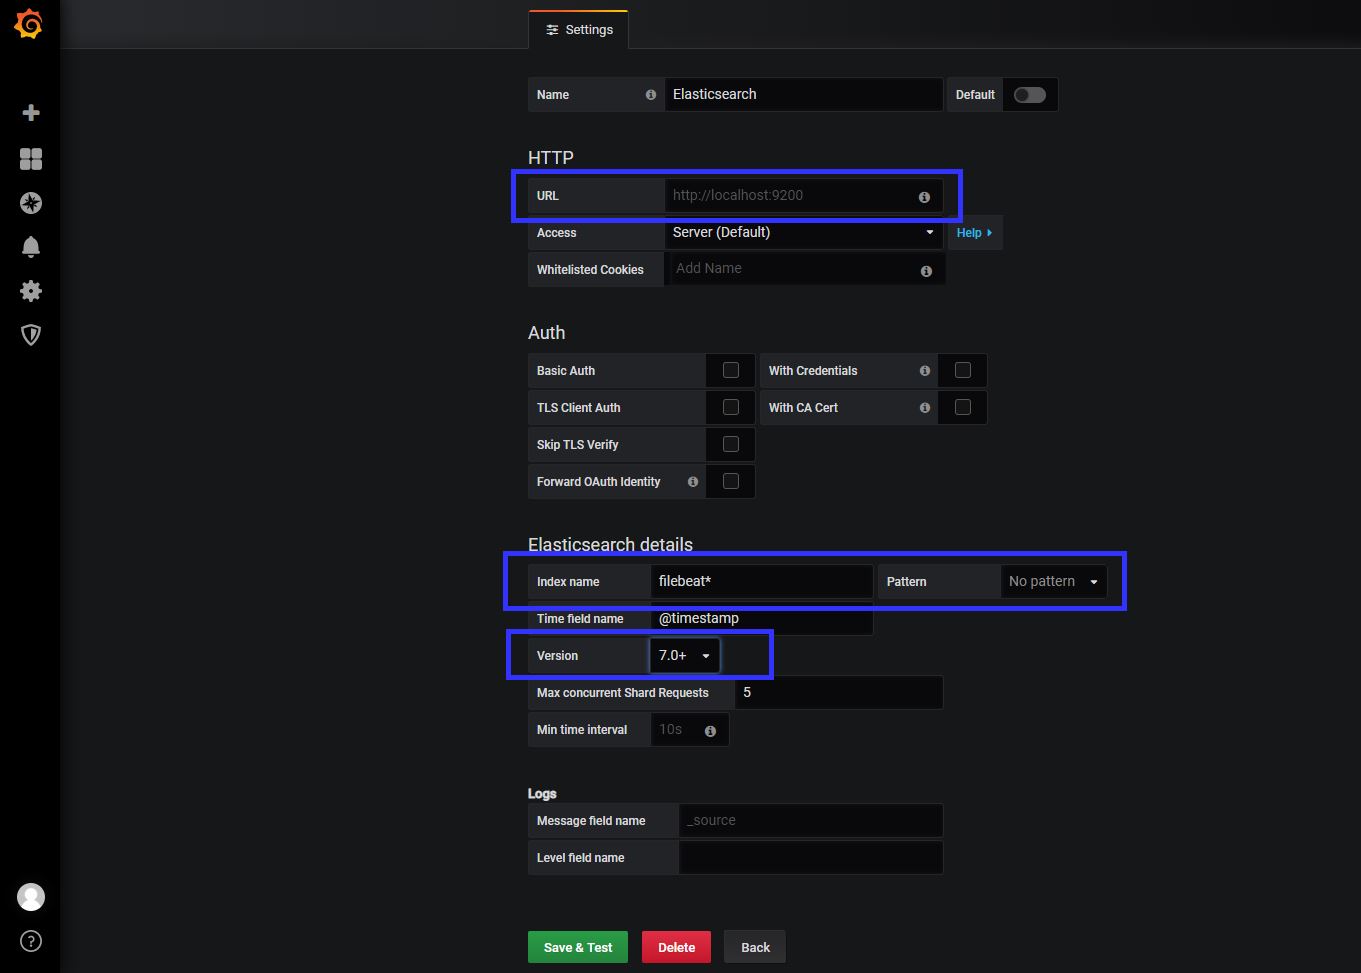
When you connect to your grafana gui , you will see a welcome page. First you need to add a data source for Grafana usage.

I have installed the latest version of elastic.co product so, I have choice the version 7+ , as a index name you can use “filebeat*” Save and test the configuration, if you success now you can able to see the logs and metric information on grafana too. 🙂

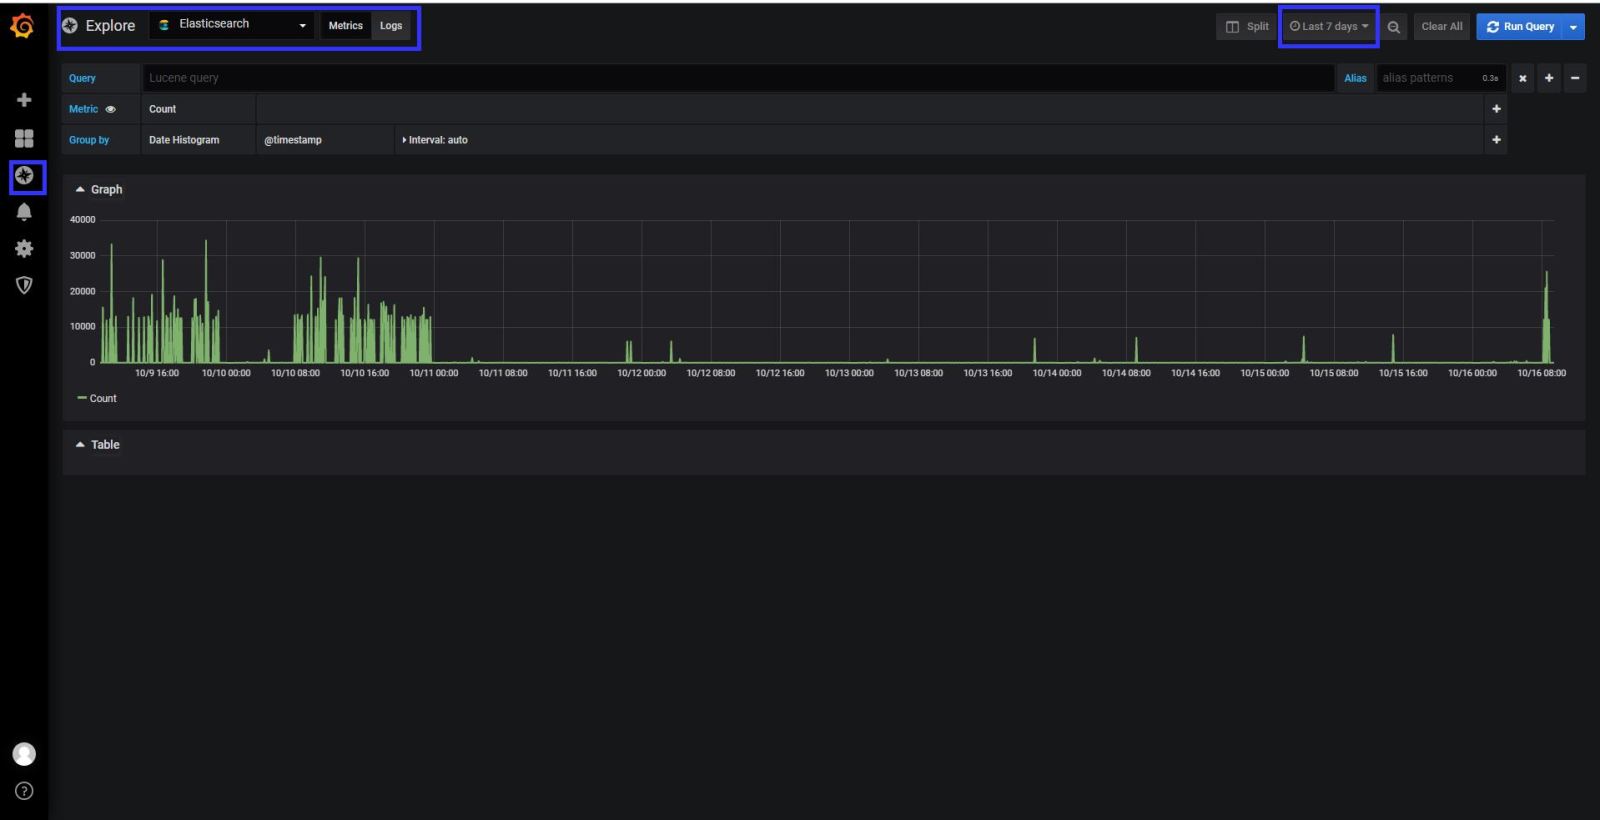
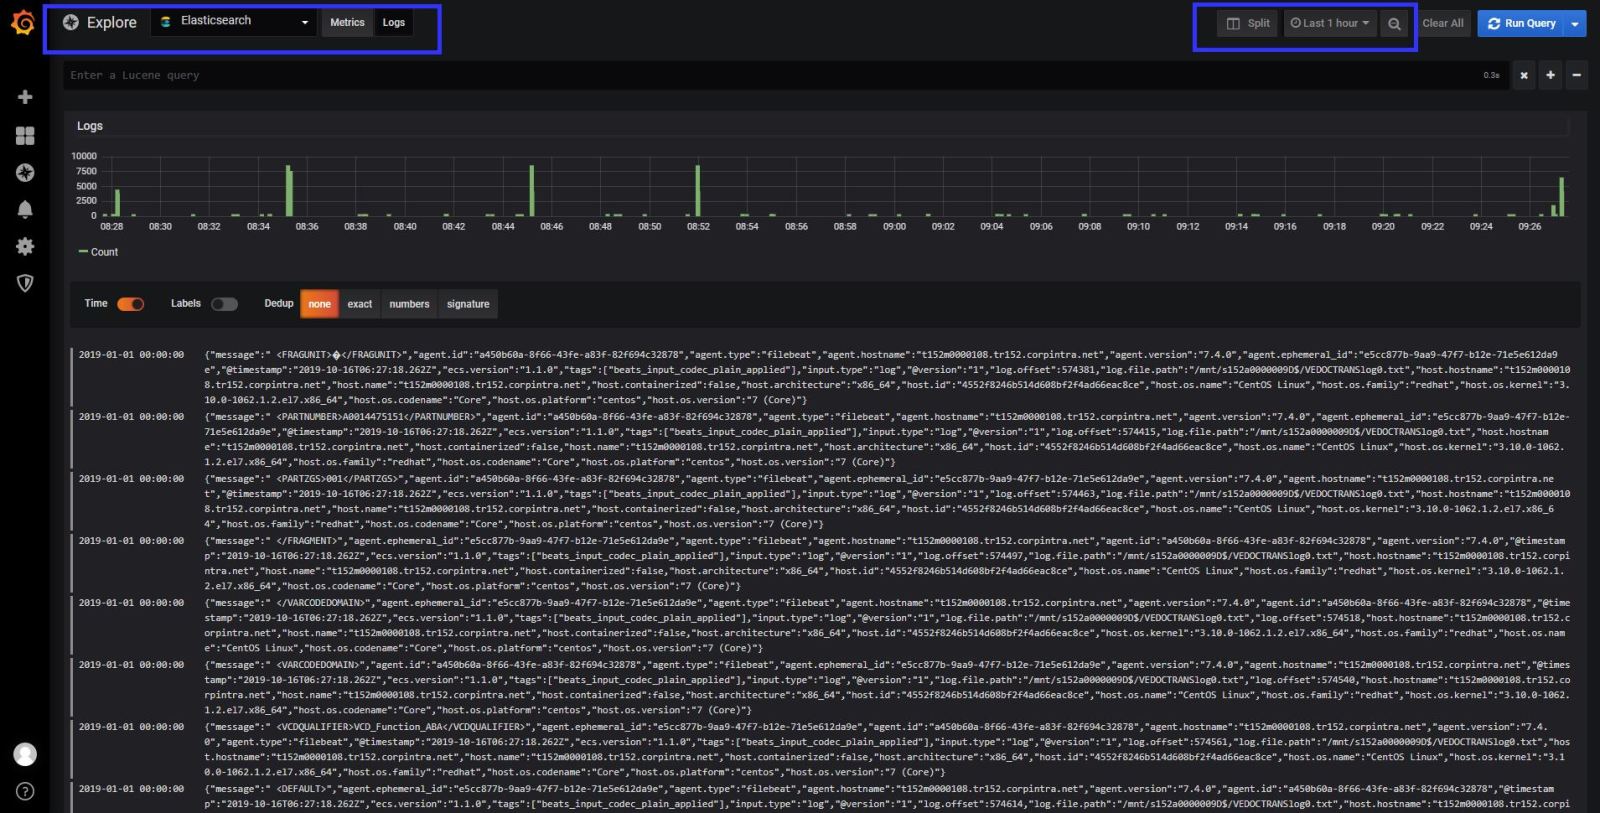
At the logs tab in the explore section , if you get an error like “Unkown elastic error response” That means elasticsearch sends big data to grafana , and grafana couldn’t understand it. You need to give small your time line to see logs in grafana. If you investigate the logs detailed , you have to use KIBANA.

Now it is time to search logs for errors and make an alert for your application team.

My application team gave me the error key words for the logs, so I know what should I search 🙂

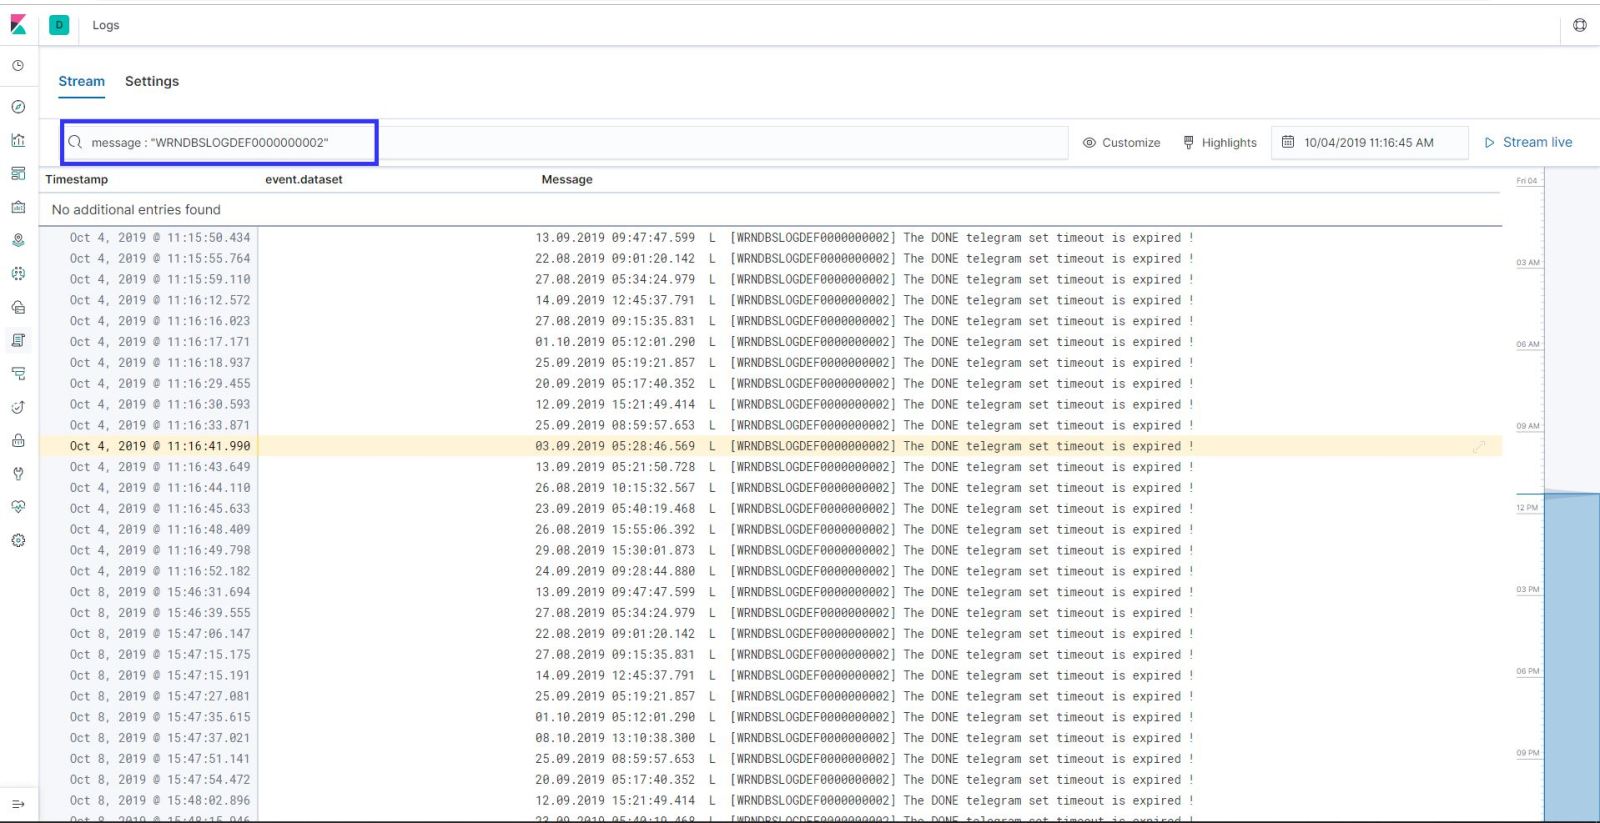
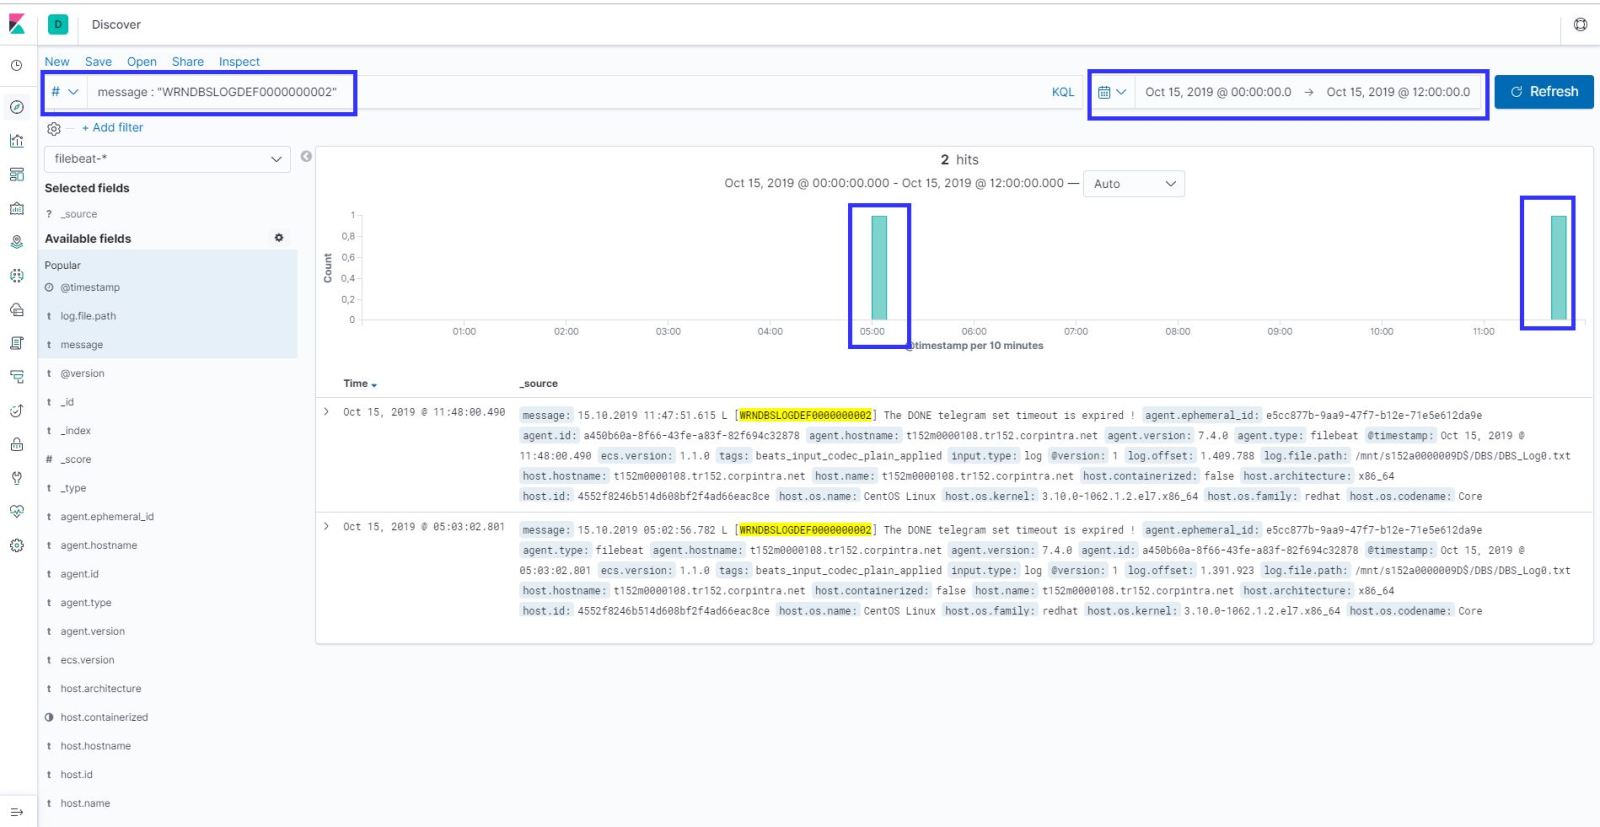
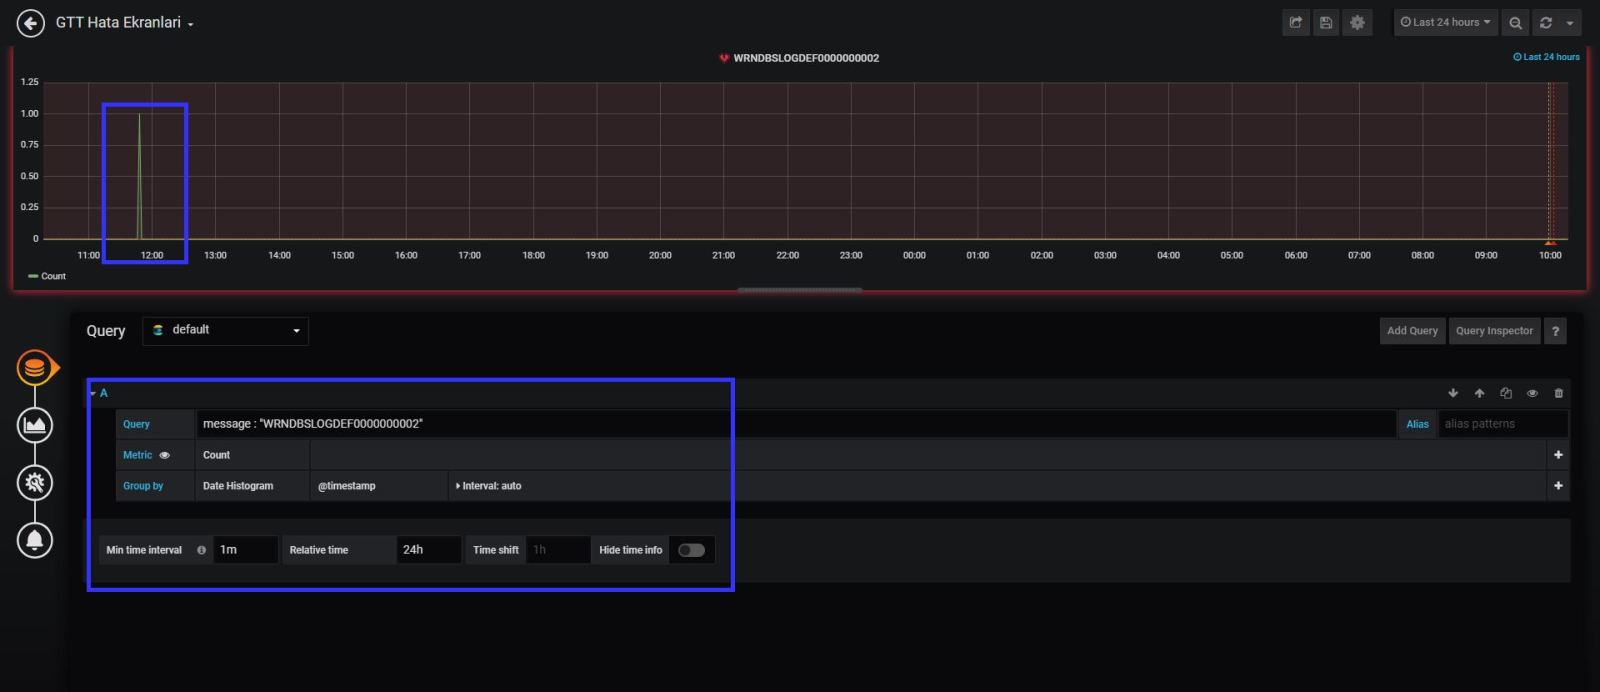
Lest take an example ; My error log key word is “WRNDBSLOGDEF0000000002” so when I found that keyword in the last 15 mins logs, I need to send an email to application team.

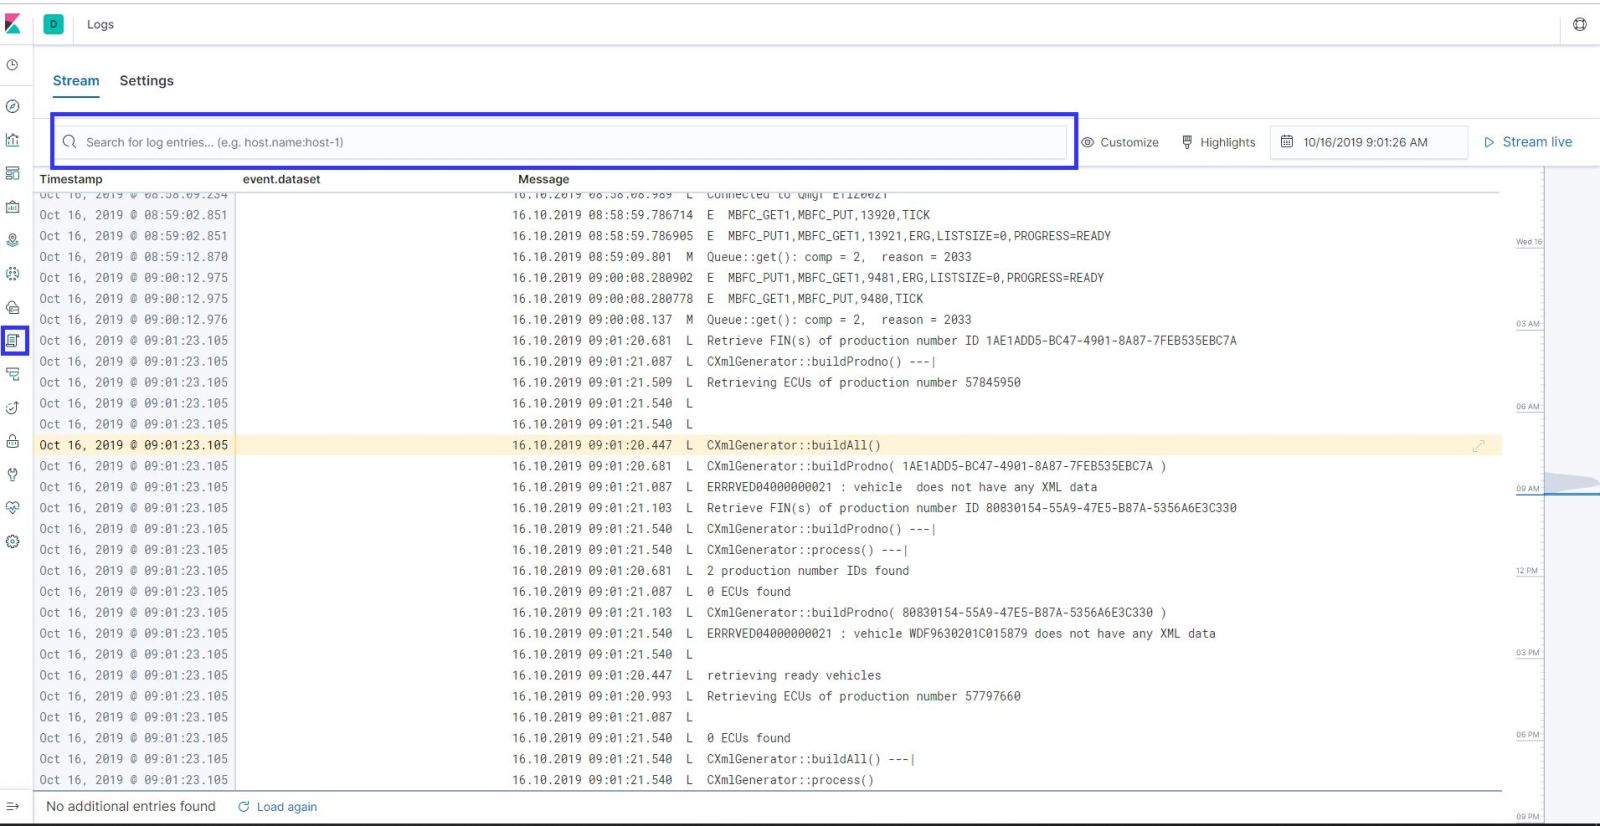
First things first; Lets search it in the logs with Kibana;

As you can see in my example , error comes to and kibana in search results.

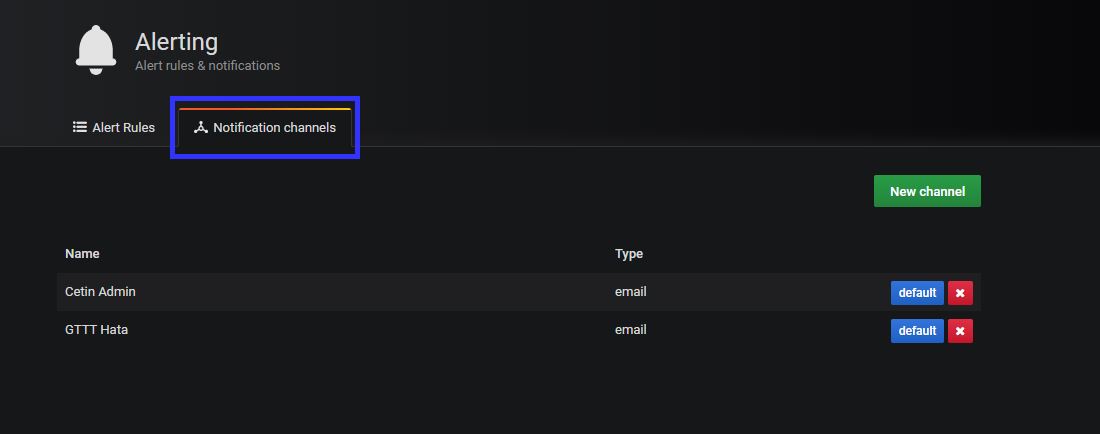
You need to define the alerts contacts information at  grafana notification channel.

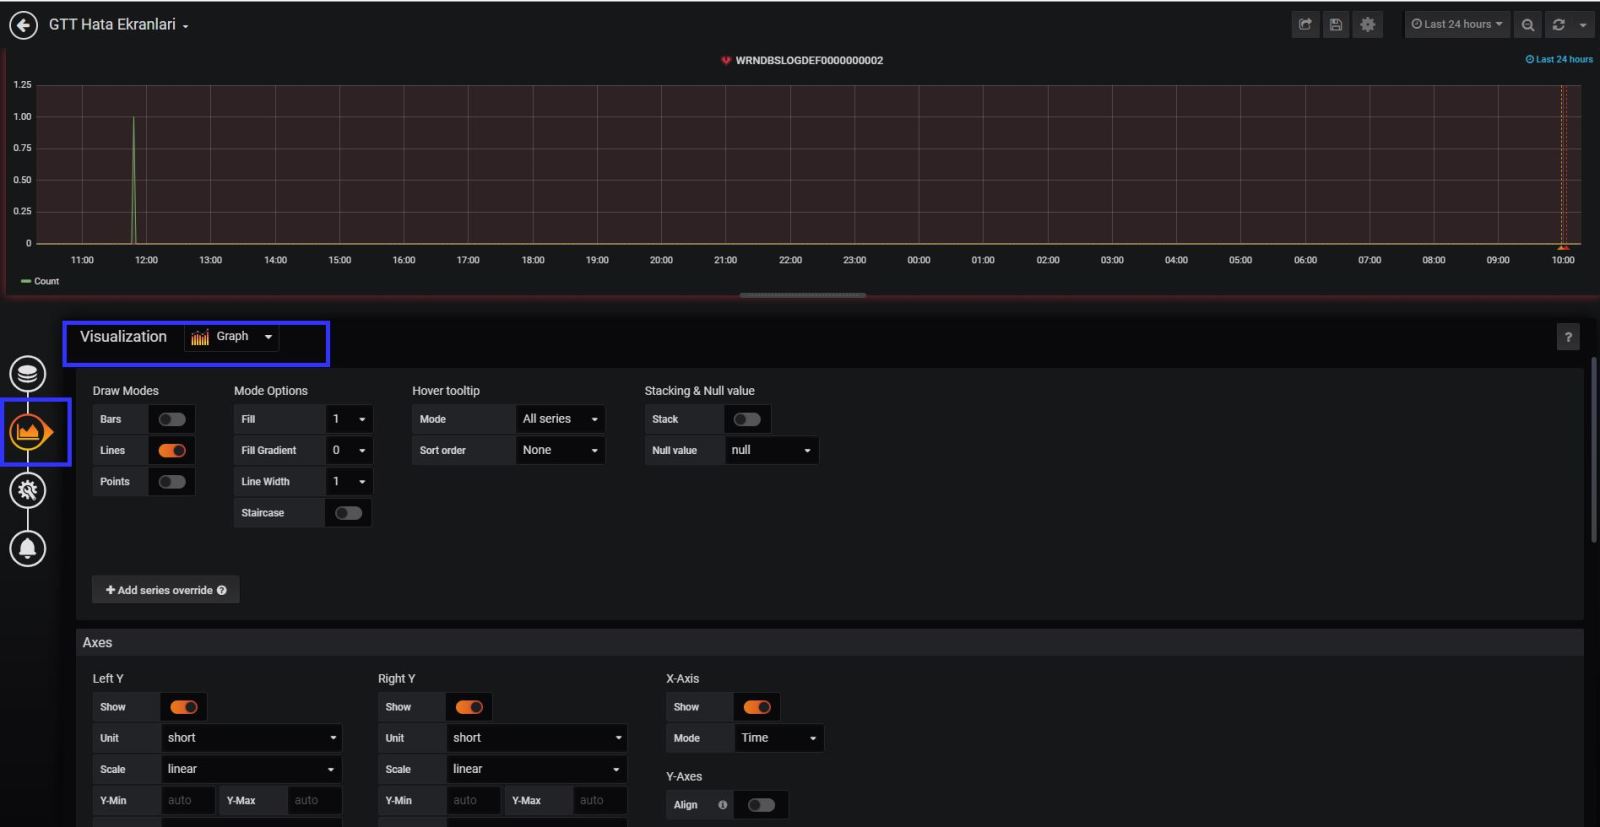
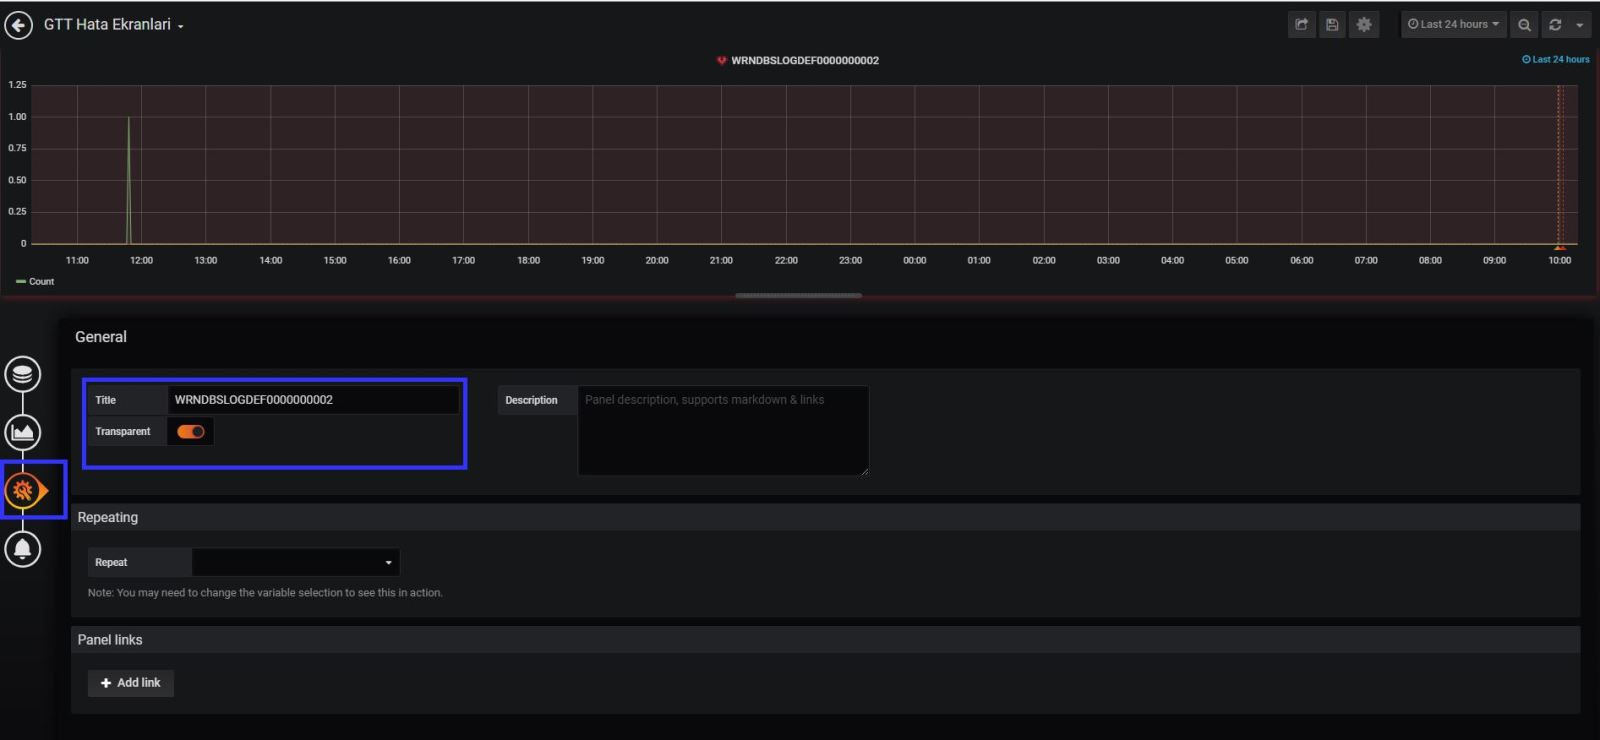
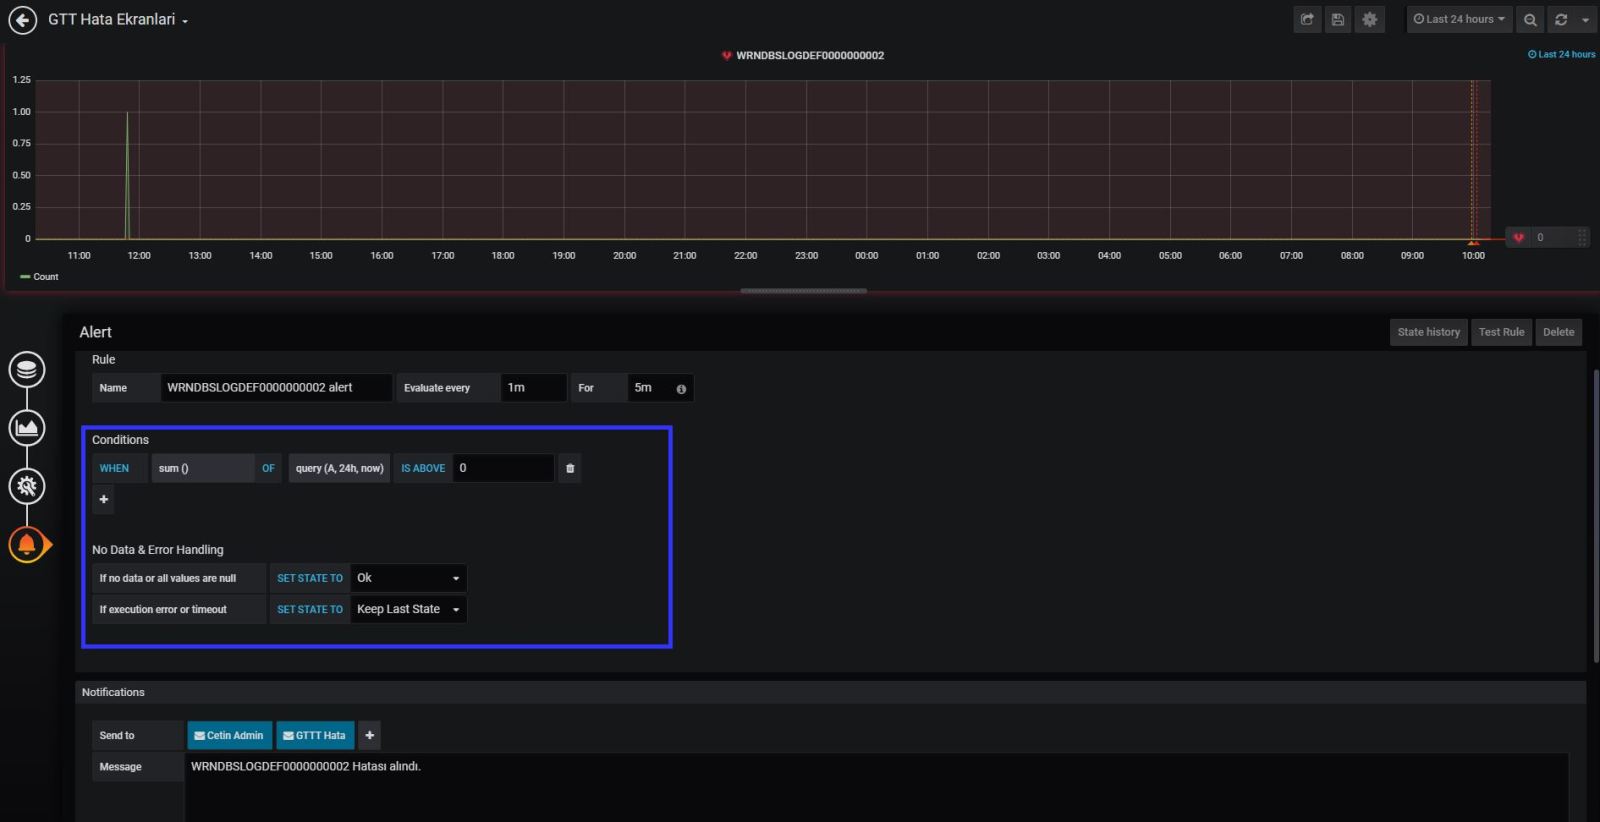
Now we need to create an alert on grafana about it.  Please check my screen shots about it. You can see the details and step by step how to do that.

Grafana alert system settings is OK. But we have last settings as grafana system configuration , which is how to send the email via SMTP server.

vim /etc/garafana/grafana.ini
[smtp]
enabled = true
host = smtpserver.domain.com
;user =
# If the password contains # or ; you have to wrap it with trippel quotes. Ex """#password;"""
;password =
;cert_file =
;key_file =
skip_verify = true
from_address = [email protected]
from_name = Grafana Alert
# EHLO identity in SMTP dialog (defaults to instance_name)
;ehlo_identity = domain.com

[emails]
welcome_email_on_sign_up = true

That’s it !!!

I am using this system about a month . My application teams are happy about it. Still I am improving it.

I will share the new updates at my future posts.

I hope it is also useful for you too.

If you have any further questions about and any suggestions. Please write comments in this post.