Migrating OnPrem GitHub, Jenkins, IIS CI/CD Environment to Azure DevOps and Kubernetes

 Introduction

With the increasing popularity of cloud platforms, many organizations are moving their development and deployment operations to the cloud. Azure DevOps and Kubernetes are two popular cloud platforms that offer several benefits to businesses. If you’re still using OnPrem GitHub, Jenkins, IIS CI/CD environment, it’s time to migrate to Azure DevOps and Kubernetes.


This article will guide you through the process of migrating OnPrem GitHub, Jenkins, IIS CI/CD environment to Azure DevOps and Kubernetes. We will explore the benefits of using Azure DevOps and Kubernetes and the steps involved in the migration process.


 Why Move to Azure DevOps and Kubernetes?


Migrating to Azure DevOps and Kubernetes offers several benefits, including:


  1. Scalability: Azure DevOps and Kubernetes offer scalability, making it easy to increase or decrease resources as needed.


  1. Cost Savings: Azure DevOps and Kubernetes are cost-effective compared to OnPrem GitHub, Jenkins, IIS CI/CD environment.


  1. Automation: Azure DevOps and Kubernetes offer automation capabilities, reducing manual work and increasing efficiency.


  1. High Availability: Azure DevOps and Kubernetes offer high availability, ensuring that your applications are always available.


Steps Involved in Migrating OnPrem GitHub, Jenkins, IIS CI/CD Environment to Azure DevOps and Kubernetes


  1. Evaluate Your Current Environment: Before migrating to Azure DevOps and Kubernetes, evaluate your current environment. Identify the applications, services, and dependencies that need to be migrated.


  1. Create an Azure Account: To use Azure DevOps and Kubernetes, you need an Azure account. If you don’t have an account, create one.


  1. Set up Azure DevOps: Once you have an Azure account, set up Azure DevOps. This involves creating a new organization and project.


  1. Create a Kubernetes Cluster: To use Kubernetes, you need to create a Kubernetes cluster. You can create a cluster in Azure Kubernetes Service (AKS).


  1. Install Jenkins in Kubernetes Cluster: Install Jenkins in the Kubernetes cluster. This involves creating a Jenkins deployment and service.


  1. Migrate GitHub Repositories: Migrate the GitHub repositories to Azure DevOps. This involves creating a new Git repository in Azure DevOps and pushing the code.


  1. Migrate Jenkins Jobs: Migrate the Jenkins jobs to Azure DevOps. This involves creating new pipelines in Azure DevOps and configuring them.


  1. Migrate IIS Applications: Migrate the IIS applications to Kubernetes. This involves creating a Docker image of the application and deploying it to Kubernetes.


  1. Test and Validate: Once you have migrated all the applications and services, test and validate the new environment. Ensure that everything is working as expected.


 FAQs


Q: What is Azure DevOps?

A: Azure DevOps is a cloud-based platform that offers several services, including source control, build and release management, and project management.


Q: What is Kubernetes?

A: Kubernetes is a container orchestration platform that automates deployment, scaling, and management of containerized applications.


Q: Why Should I Migrate to Azure DevOps and Kubernetes?

A: Migrating to Azure DevOps and Kubernetes offers several benefits, including scalability, cost savings, automation, and high availability.

Conclusion

Migrating OnPrem GitHub, Jenkins, IIS CI/CD environment to Azure DevOps and Kubernetes is a necessary step for organizations that want to take advantage of the benefits offered by cloud platforms. The migration process involves evaluating your current environment, creating an Azure account, setting up Azure DevOps, creating a Kubernetes cluster, installing Jenkins in the Kubernetes cluster, migrating GitHub repositories and Jenkins jobs, migrating IIS applications, and testing and validating the new environment.

By migrating to Azure DevOps and Kubernetes, you can enjoy scalability, cost savings, automation, and high availability. Make the move and take your business to the next level.
Windows OS Deployment via Ansible AWX Server on ESX Enviroment

Windows OS Deployment via Ansible AWX Server on ESX Enviroment

Hi all, yes it has been a while since my last publish but believe me, in this days , I mean at home office working times. I am working harder and much busy than office working times.

This post I would like to share how to automatize my Windows OS installations on ESX environment via Ansible AWX system.

For this automation steps we need some knowledge about the tools and environment. I will not explain how to install the system or detailed explanation about the systems, I will give you some descriptions , you need follow the documents and learn the tools basics.

What is AWX;

You can find many documents at the internet about it but github project page simple explanation is ; “AWX provides a web-based user interface, REST API, and task engine built on top of Ansible. It is the upstream project for Tower, a commercial derivative of AWX. ” You will find many detailed how to documents about it at “https://github.com/ansible/awx

What is Ansible ;

Ansible is an IT automation tool. It can configure systems, deploy software, and orchestrate more advanced IT tasks such as continuous deployments or zero downtime rolling updates.  Source Ansible Documentation page

What is VMware ESX;

Most of IT people has deep knowledge what is this and how to manage it. Yes most popular Hardware Virtualization solution for corporate IT environment . You can find the latest updates on this page about it.

Lets Continue with the Windows OS Installation steps;

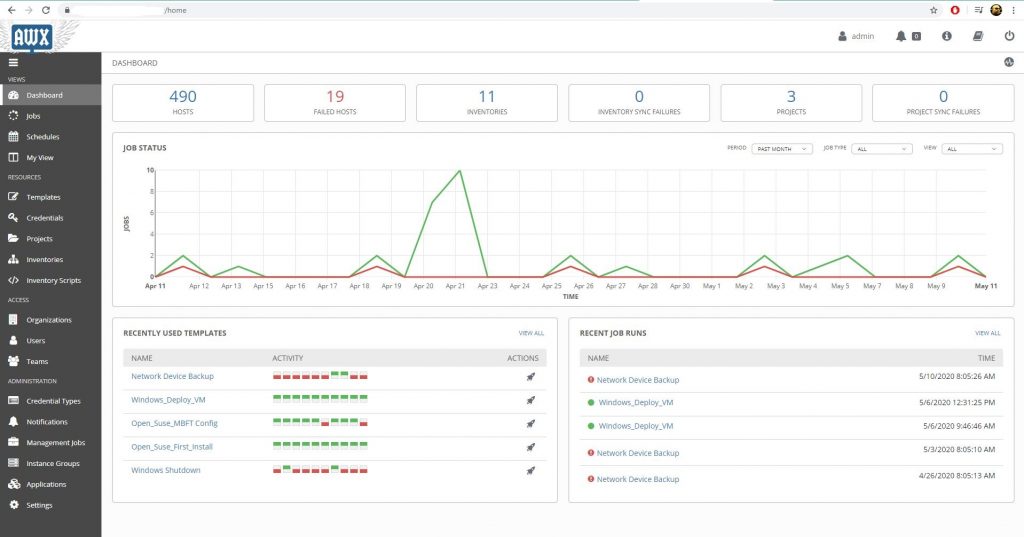
This is the general view of the AWX dashboard.

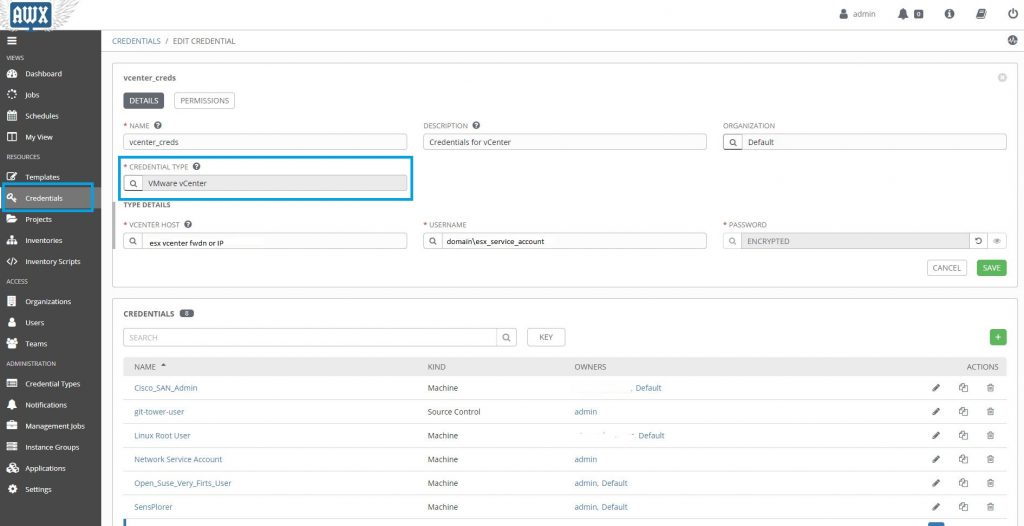
First things first , Lets start with ESX Vcenter access credentials, that user need to have full admin rights on ESX system.

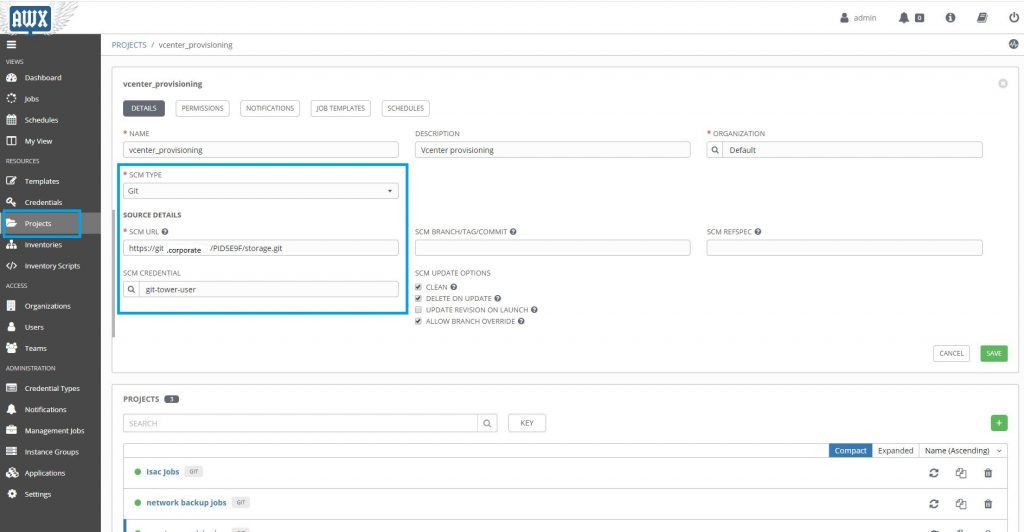
Now for source code management we need to create a project on AWX. I am storing the yaml codes on our corporate github.

You need  also create credentials for github access to download yaml codes. Same as esxvcenter access cred.

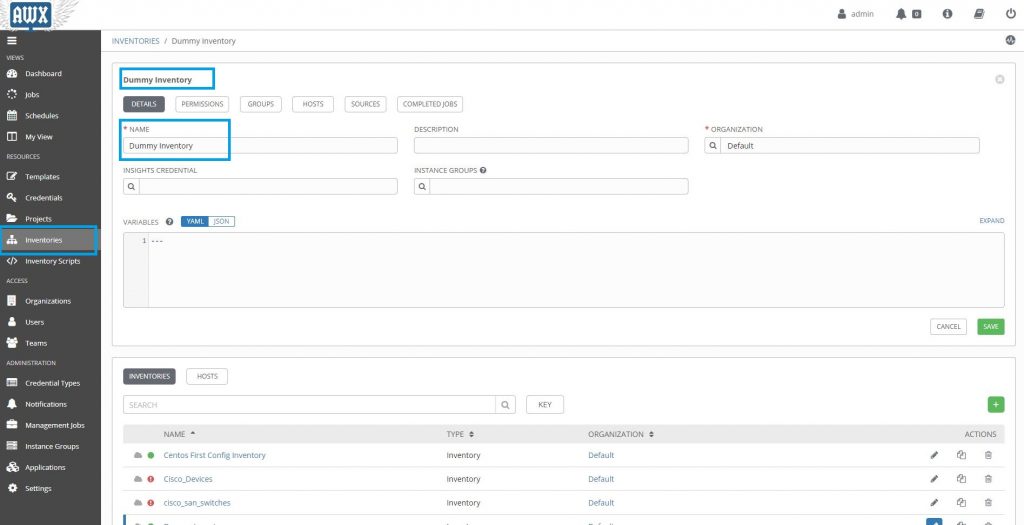
Now we need a dummy inventory group for esx server access .  Dummy inventory is just an empty inventory group.

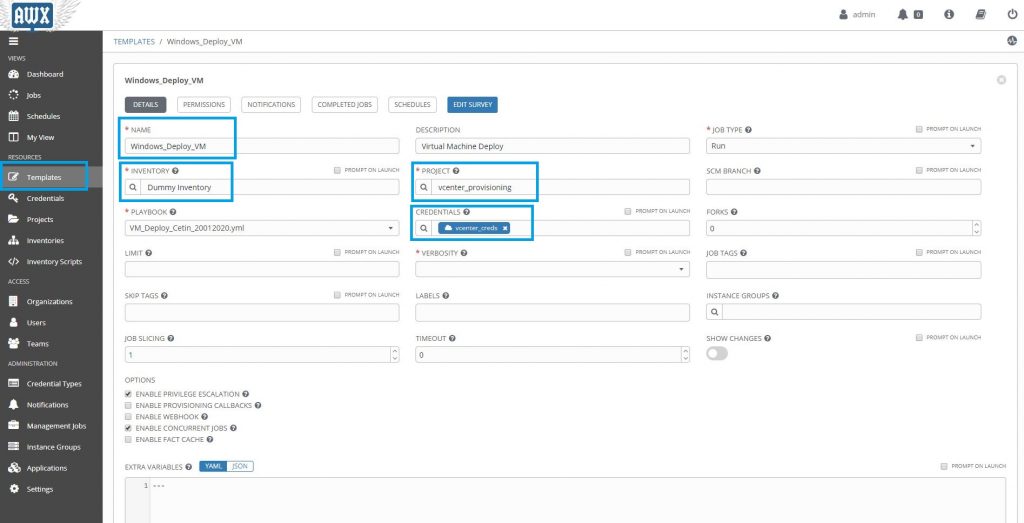
Now time to create a template for our windows OS deploy job. In this section we need to choose which inventory group will use for this,  which project will use for the yaml codes group and which yaml playbook code file should use for it.

Let me share my playbook yaml file with you for give you some idea about the Virtual Windows OS deployment.

I am sharing the code as downloadable file because yaml file indents very important so web site copy paste could harm the indents.

VM_Deploy_Cetin_20012020.yml


---

- name: Create VM Instance
  hosts: localhost
  connection: local
  gather_facts: false


  tasks:

    - name: Check if all variables have been defined
      fail:
        msg: "{{ item }} is not defined"
      when: "{{ item }} is not defined"
      with_items:
        - datacenter
        - cluster
        - folder
        - vmname
        - datastore
        - vlan_name
        - template
        - ip
        - netmask
        - gateway
        - dns1
        - dns2
        - template
        - vm_password
        - fqdn_domain
        - domain_join_account
        - domain_join_password


    - name: Create a VM from a template
      vmware_guest:
        hostname: '{{ lookup("env", "VMWARE_HOST") }}'
        username: '{{ lookup("env", "VMWARE_USER") }}'
        password: '{{ lookup("env", "VMWARE_PASSWORD") }}'
        datacenter: "{{ datacenter }}"
        cluster: "{{ cluster }}"
        folder: "{{ folder }}"
        validate_certs: no
        name: "{{ vmname }}"
        template: "{{ template }}"
#        wait_for_ip_address: no
        datastore: "{{ datastore }}"
#        - name: Add NIC to VM
#          ovirt_nic:
#          state: present
#          vm: "{{ vmname }}"
#          name: "{{ vlan_name }}"
#          interface: vmxnet3
#         mac_address: 00:1a:4a:16:01:56
#          profile: ovirtmgmt
#          network: ovirtmgmt
        state: poweredon
        networks:
        - name: "{{ vlan_name }}"
          device_type: vmxnet3
          start_connected: yes
          ip: '{{ ip }}'
          netmask: "{{ netmask }}"
          gateway: "{{ gateway }}"
          dns_servers:
           - "{{dns1}}"
           - "{{dns2}}"
          wait_for_ip_address: yes

        customization:
          autologon: yes
          hostname: "{{ vmname }}"
          password: "{{ vm_password }}"
          domainadmin: "{{ domain_join_account }}"
          domainadminpassword: "{{ domain_join_password }}"
          joindomain: "{{ fqdn_domain }}"
          runonce:
          - C:\Windows\System32\cmd.exe /c "C:\Ansible_Workaround\domain_group.cmd"

      register: deploy_vm
      ignore_errors: yes

    - name: Result of Virtual machine
      debug:
        var: deploy_vm

when you check the code you will see defined couple of variables in this code like ; datacenter,cluster,folder,ip,template etc..

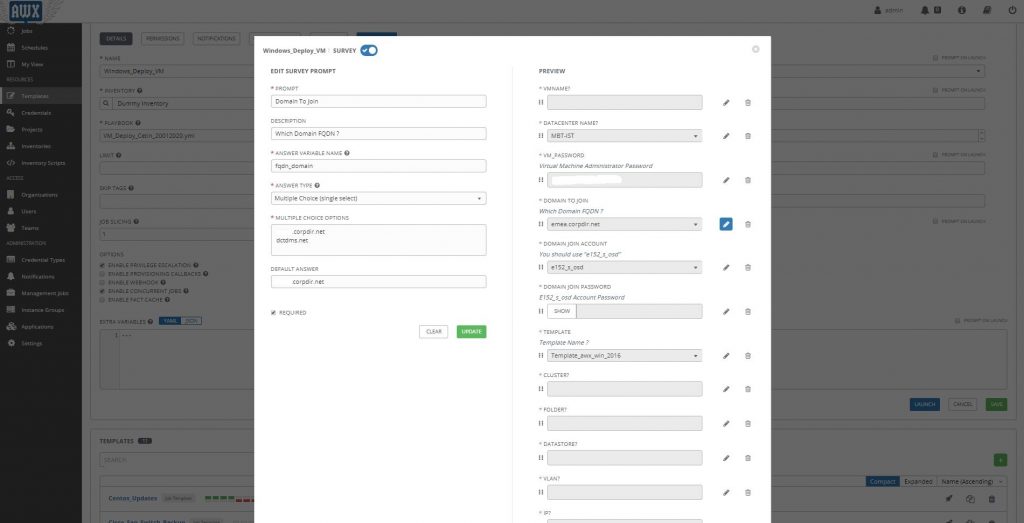
We need the answer this variables at the AWX system. For this purpose we need to reedit the template and define  survey for it. Every step of this survey need to answer in the code.  for example “fqdn_domain” check the screenshot.

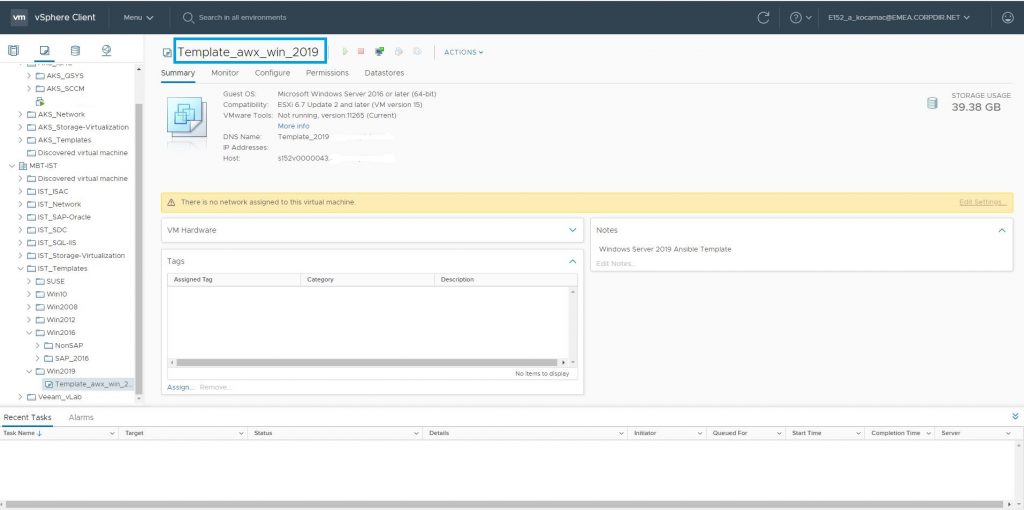
Now we need a Virtual Machine Template for the deployment usage. I have created many templates for this purpose for every Windows OS versions.

As you know ESX enviroment can generalize the cloned template to machine. We are triggering  this option automatically while cloning the machine.

The important point is in that template you need to install vmtools. Because awx tells the operation steps to  the esx, esx customizing the  Windows OS via vmtools.

On my environment I am not a domain admin group member. I am a member of specific OU admin group , that’s why I have put a small run ones script to template machine “C:\Ansible_Workaround\domain_group.cmd”

@echo off
net localgroup administrators domain\OU_Admins /ADD
TZUTIL /s "Turkey Standard Time"

Lets demonstrate a deployment;

First go to template and check it ones more; If everything seems OK, press the rocket icon and start the deployment. Answer the questions about the VM name, Ip,Gateway,LocalAdmin Passwords etc.

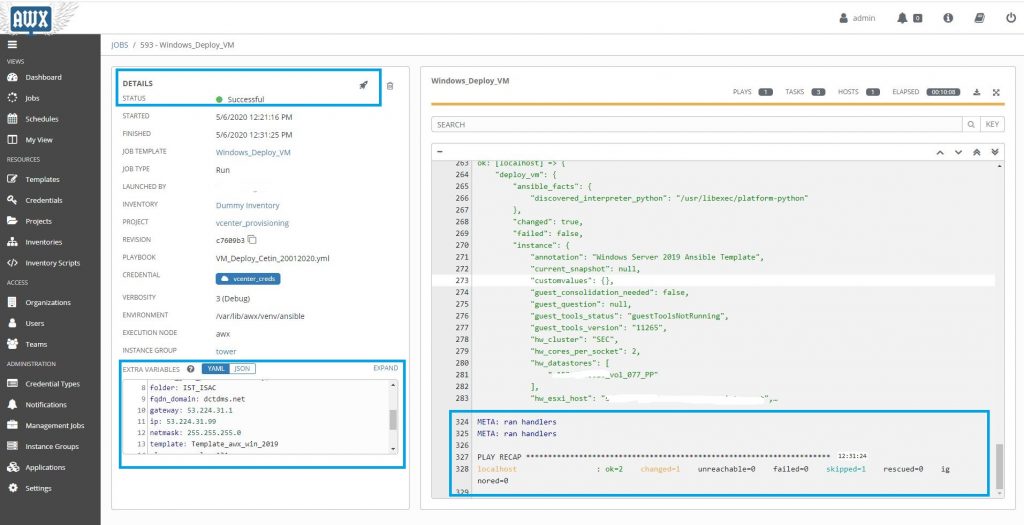
After it click the deploy. It start to deploy and depend about your environment speed , it will take time about ten minutes.

If you success you will see a screen like that;

I hope , This document  will help you have an idea about the ansible AWX and Windows deployment process.

Conclusion ;

Ansible is a big sea in IT world. If you learn how to sail in it , you will find many automation variations for your daily job. For example; I am using it take Cisco Switch backups in every week more than hundred device. May be it will be another  story on this blog.

I would like to special thanks to my colleague Tolga Asik for his cooperation with his VM knowladge  and also Mustafa  Sarı with his storage knowledge.


New Project with Devops Chain Tools

Starting  to the Devops Journey

In April 2019, we initiated building a DevOps environment in our corporate while starting a new project.
I will give a short brief for every main actors in the DevOps chain and finally show the continuous delivery flow of our project.

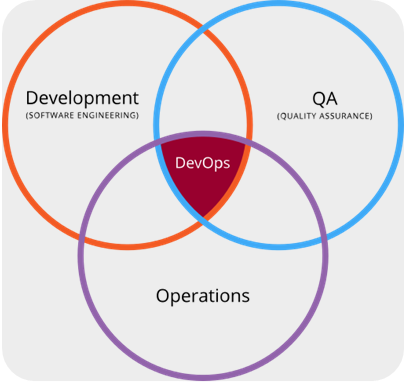
What is DevOps?

  • Is a set of software development practices
  • Combines software development and information technology operations to shorten the systems development life cycle
  • Delivering features, fixes, and updates frequently in close alignment with business objectives

Current DevOps Chain in our project:

A DevOps toolchain is a set or combination of tools that aid in the delivery, development, and management of software applications throughout the systems development life cycle, as coordinated by an organisation that uses DevOps practices. Below picture shows the actors in our project DevOps chain:

What is Jira?

Jira is a issue tracking product developed by Atlassian that allows bug tracking and agile project management.

  • Plan – Create user stories and issues, plan sprints, and distribute tasks across your software team
  • Track – Prioritize and discuss your team’s work in full context with complete visibility
  • Release – Ship with confidence and sanity knowing the information you have is always up-to-date.
  • Report – Improve team performance based on real-time, visual data that your team can put to use.

What is GitHub?

GitHub is a code hosting platform for collaboration and version control. GitHub lets you (and others) work together on projects.

What is Jenkins?

Jenkins is an open source automation server which helps to automate the non-human part of the software development process

  • building
  • testing
  • delivering or deploying

What is SonarQube?

SonarQube is the leading product for Continuous Code Quality which detects bugs, code smells, and security vulnerabilities on 20+ programming languages. With a Quality Gate in place(Jenkins), you can fix the leak and therefore improve code quality systematically.

Project Continuous Delivery Flow

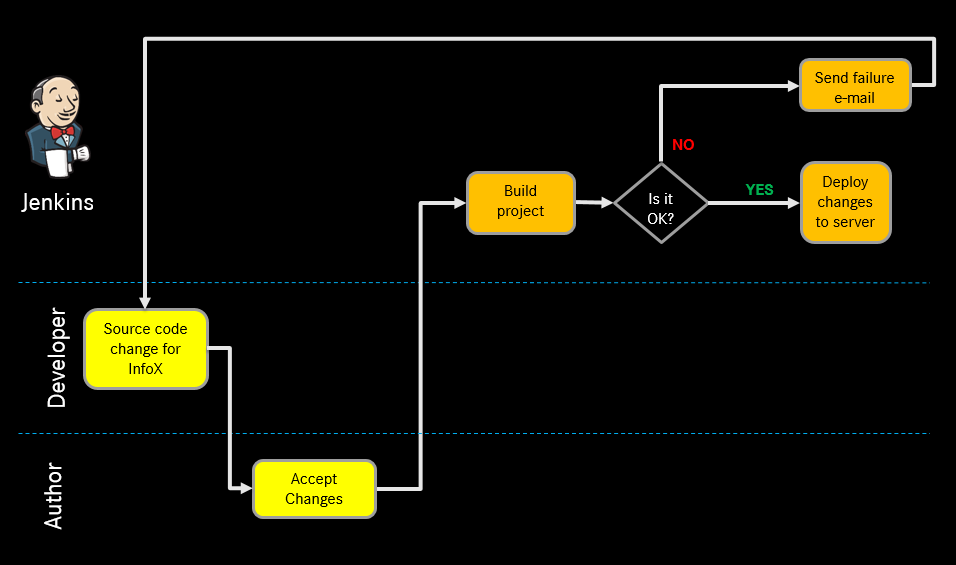
Continuous delivery automates the entire software release process. Every revision that is committed triggers an automated flow that builds, tests, and then stages the update. The final decision to deploy to a live production environment is triggered by the developer. Here is the flow prepared for Project:

We are planing to add the selenium test automation tool to our system and we will integrate it with Jenkins. I will share it soon.

In many thanks to for the contributions about it to Serhat Karataş.